What does a belt-pouch kit add over a tin?
The functions the tin delegates: real shelter (mylar bag or blanket plus poncho), real water capacity, a real light, a real blade, and cordage in useful lengths. One pouch of roughly 6 × 4 × 2 in (15 × 10 × 5 cm), under 1 lb (450 g) total, wearable on a belt or dropped in any bag.
The pouch build is the tin’s graduation: same method, one size up, and the sweet spot for day-to-day preparedness. It’s small enough to wear without conversation and complete enough to handle the unplanned night that the tin only bridges. The architecture is the pattern to copy: a sealed core (the Chapter 30 tin, intact) surrounded by the bulk items that need no seal and want fast access.
That two-part architecture solves the small kit’s classic tension: audit-friendliness versus readiness. The tin stays taped and calendar-audited; the outer items (poncho, blanket, light) deploy in seconds without breaking any seal.
The build, item by item
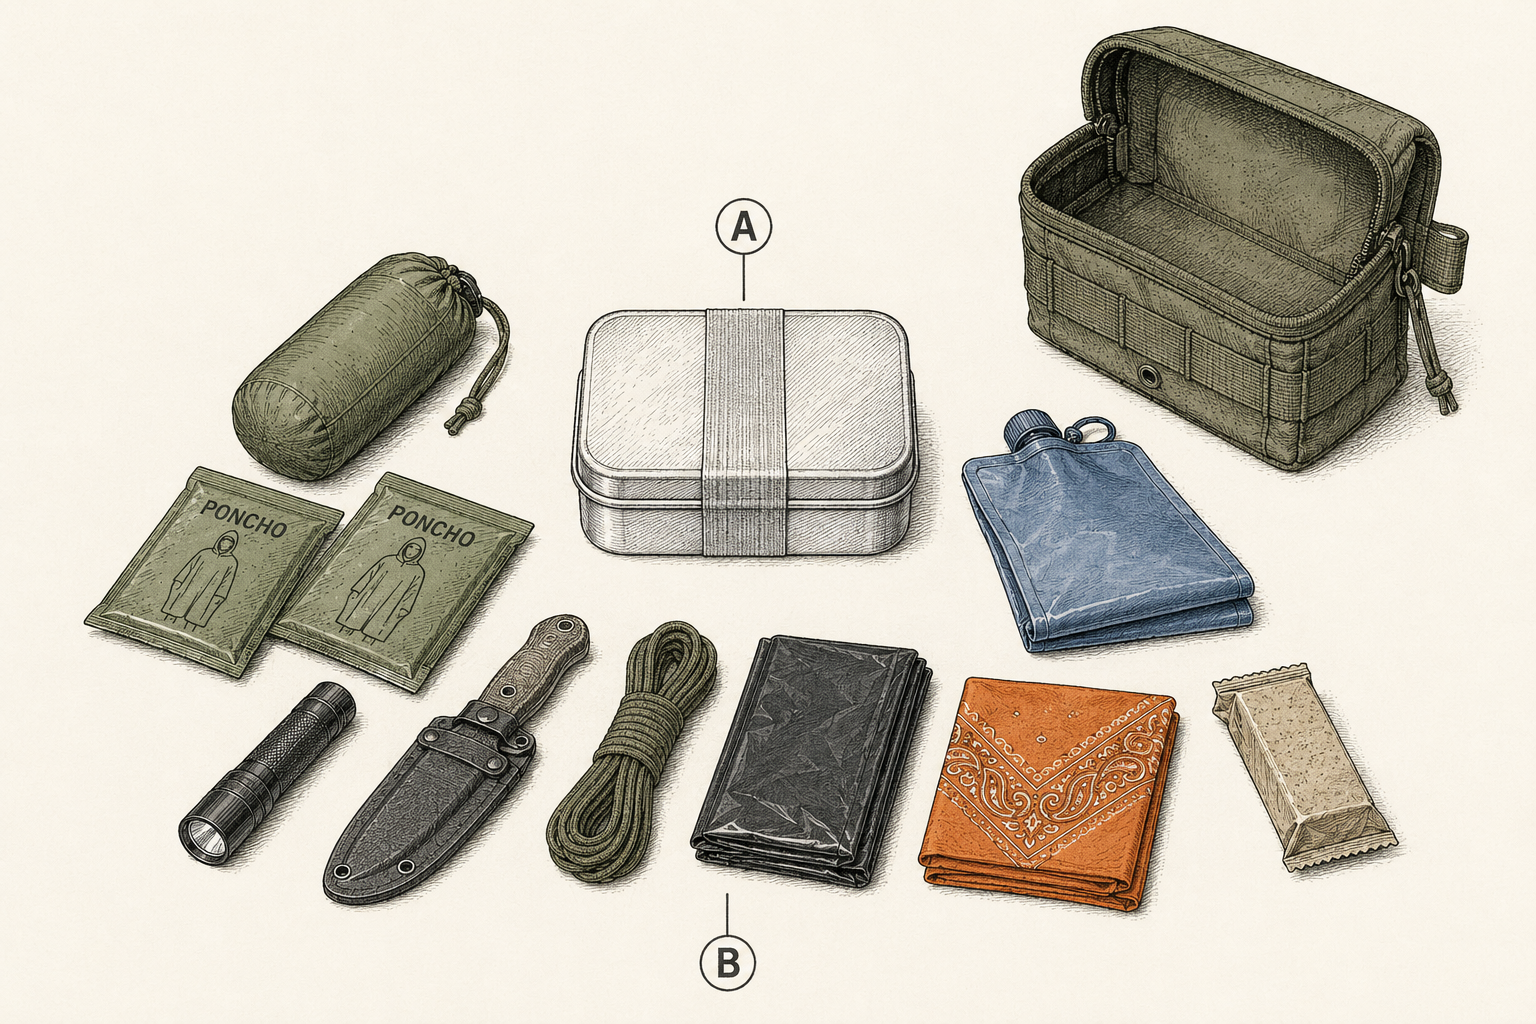
The pouch contents around the tin core:
| Item | Spec | Why |
|---|---|---|
| The tin | Chapter 30‘s build, sealed | All six functions at minimum scale; the core |
| Emergency bivvy or 2nd blanket | Bag-style preferred (Ch. 20) | The night the tin can’t cover |
| Emergency poncho ×2 | Cheap grade is fine here | Rain now; shelter fabric later |
| Water pouch, 1 L | Second one, beyond the tin’s | Real capacity; dirty/clean split possible |
| Single-cell flashlight | AA/AAA, lithium loaded | Real light beyond the tin’s button LED |
| Fixed or stout folding knife | Small fixed with flat sheath rides pouches well | The real blade the tin lacks |
| Paracord | 25 ft (7.5 m) hanked | Chapter 22‘s working lengths begin |
| Contractor bag | One, folded flat | Chapter 27‘s architecture blank |
| Bandana | Orange | Filter, sling, signal, wrap |
| Ration bar or two granola bars | Sealed | Calories and morale for the long evening |
| Mini first aid add-on | Elastic wrap + gauze roll | The pouch’s upgrade over the tin’s minimum |
Packed weight lands at 14–16 oz (400–450 g) and cost at $60–90 including the tin. Everything outside the tin obeys a one-second rule: findable and deployable by feel, because the pouch’s likeliest opening is dusk, rain, or both. Pack for cold fingers.
Wearing it: the carry problem solved
A pouch kit earns its keep by having answers the pack doesn’t: it’s on your body during the wander-from-the-car moments that strand people, and it transfers between bags in one motion. Belt, shoulder strap, or clipped inside whatever you’re carrying: pick the mode you’ll actually use.
The carry modes, honestly compared: belt-worn is the classic (always on you during field days; invisible under a jacket) and the mode that makes this kit Layer 2.5 in Chapter 3‘s stack. Bag-resident (clipped into whatever daypack, tote, or luggage is in play) trades body-carry for zero fashion friction and suits urban lives. Strap-slung (a shoulder cord through the pouch’s loops) is the grab-mode for vehicle staging: hanging on the seat back, it boards with you in ten seconds when the car is abandoned. That mode saves minutes.
Whatever the mode, the retention rule from the micro layer scales up: a carabiner or strap through a fixed loop, because a kit that can fall off a log crossing is a kit with a countdown. Clip it every single time. And the color rule holds: field-tone pouches vanish; a strip of orange tape or cord costs nothing.
Packing geometry and access order
Pack the pouch by access probability, not category: light and poncho at the top or outer pocket, blade and cordage at the sides, the tin and bivvy at the bottom, bar and bandana wherever they fit. The kit’s most-likely openings are “dark” and “rain,” so those answers surface first.
The geometry lesson generalizes to every soft kit: gravity and zippers conspire to bury whatever you packed first, so packing order is access order in reverse. The two-pocket pouches (main compartment plus flat outer zip) make it easy: outer zip gets light, poncho, and bandana; main gets the rest with the tin flat at the back wall where it stiffens the pouch and shields contents.
Two micro-habits finish the build: a gear tie or rubber band corrals the cordage hank against the tangle it’s plotting, and a dated index card rides inside: contents list on one side (the audit’s cheat sheet), Chapter 29‘s contact-card info on the other. Every kit from this size up carries its own manifest; memory is not a manifest. Write the card tonight.
Variants: the pouch as chassis
The pouch build is a chassis that re-bodies by scenario: the hiker’s version adds a filter and whistle-upgrade; the urban get-home version swaps blade size down and adds walking-comfort items; the winter version (Chapter 4‘s module) claims the outer pocket entirely.
The variant table, in the compressed form the method now earns: Trail: add the squeeze filter (Chapter 11) and swap the flashlight for a headlamp; the pouch now backs a day hike solo. Urban get-home: blade to multitool (checkpoint and optics logic), add moleskin doubled, a dust mask, and transit cash; it lives at the office (Chapter 33‘s little sibling). Winter: the outer pocket becomes Chapter 4‘s winter module verbatim (cap, warmers, candle, metal cup strapped outside), and the second poncho upgrades to a real blanket. Paddler: the whole pouch goes in a roll-top dry bag one size up, per Chapter 5, and a whistle moves to the PFD where Chapter 37 insists it live.
The chassis discipline mirrors the tin’s variant rule: a third of the contents flex; the core never does.
What this kit assumes and delegates
The pouch assumes Layer 1 is present (your real lighter, phone, and daily knife) and delegates duration upward: no real food depth, no cook system beyond the tin’s foil, no trauma module. Those live in the pack (Chapter 32 onward), and the pouch’s manifest card says so.
This is the last small build, so the delegation ledger deserves its full accounting. Covered completely at pouch scale: the unplanned night (shelter, fire, water treatment, signaling, light). Covered minimally: first aid (everyday tier plus a wrap; Chapter 26‘s bleeding module starts at pack scale for space reasons, and moving it down to the pouch is a legitimate personal call for chainsaw owners and backroad drivers). Not covered: multi-day anything, cooking beyond boiling, navigation beyond the button compass (add a folded local map to the outer pocket and the gap halves).
Reading your own delegation ledger honestly is the skill: every kit is a set of bets about what its owner will face within reach of the next layer. Name your bets. Write the bets down and they become auditable; leave them implicit and they become surprises.
Pack This Chapter
- The pouch is the tin graduated: sealed core plus bulk layer, under 1 lb (450 g) and $60–90, wearable or bag-resident.
- Architecture: tin stays taped (audit discipline); bivvy, ponchos, water, light, blade, cordage, and bag deploy sealed-free in seconds.
- Pack by access probability: dark and rain answers surface first; the tin stiffens the back wall.
- Retention clip, orange marking, cordage corralled, manifest card inside: memory is not a manifest.
- Variants flex a third (trail, urban, winter, paddler); the delegation ledger (no trauma module, no duration) is written, not implied.
Where Kits Fail
- Category packing. First aid beside first aid, fire beside fire, and the light at the bottom at dusk. Access probability is the filing system.
- The tangle. Twenty-five feet of cordage, self-knitted in transit. A rubber band is the whole fix.
- Invisible delegation. The owner assumes trauma gear is “in there somewhere.” The manifest card ends the assumption.
- Fashion-tone pouches. Coyote brown on the forest floor at dusk performs its camouflage flawlessly. Orange tape, one strip.
Frequently asked
What should a small survival kit include?
A sealed tin core (all six functions at minimum scale) plus the bulk the tin can’t hold: an emergency bivvy, two ponchos, a liter of water capacity, a real flashlight, a real blade, 25 ft (7.5 m) of paracord, a contractor bag, a bandana, a ration bar, and an elastic wrap. Under a pound total.
Is a belt pouch better than a backpack kit?
Different jobs: the pouch is worn during the short wanders that strand people (the overlook, the firewood walk) when the pack is in the car. It covers one unplanned night; the pack covers days. The system answer is the pouch as Layer 2.5, feeding into the pack, not competing with it.
How should you organize a small kit pouch?
By access probability: light, poncho, and bandana in the outer pocket (dark and rain are the likely openings); blade and cordage at the sides; the sealed tin flat against the back wall; bivvy and food filling the middle. Add a dated manifest card: every kit this size should carry its own contents list.
How heavy is too heavy for a belt kit?
Past about a pound (450 g), belt carry starts announcing itself and migration to a drawer begins. The build here lands at 14–16 oz (400–450 g) deliberately. If your additions push past that, the answer isn’t a bigger belt; it’s promoting the extras to the pack layer where they belong.