What knife should be in a survival kit?
A plain-edged fixed blade of 3.5–4.5 in (9–11 cm) with a full tang is the reference survival knife; a quality locking folder is the everyday stand-in that’s actually present. Most systems want both: the folder on you, the fixed blade in the pack.
If the kit could hold one tool, it would be a knife: it manufactures the things you didn’t carry (tent stakes, tinder, trap parts, splints), processes food and fuel, and repairs everything else. That importance attracts more marketing nonsense than any other category in this book, so this chapter’s promise is boring competence: what the shapes and specs actually mean, what to spend, and which blade rides in which layer. The knife conversation is famously a taste war; the parts below are the parts that aren’t.
One scope note: this is a tool chapter. Knives in this book cut wood, food, and cord. Choosing gear by fantasy instead of function is how people end up with Chapter 6‘s junk, and the “tactical” aisle is where that mistake goes to shop.
Fixed or folding
A fixed blade is stronger, faster to deploy, easier to clean, and impossible to fold onto your fingers; a folder is what you’ll actually have in your pocket at the gas station. Strength argues for fixed; presence argues for folding; the layered system carries both.
The fixed blade’s case is structural: one piece of steel from tip to pommel (the full tang below) has no pivot, no lock, and no failure hinge, which matters exactly when you’re batoning firewood, prying (gently, and knowing it costs edges), or working with cold-clumsy hands. The folder’s case is Chapter 3‘s whole thesis: it passes the daily-carry test, so it exists at the moment of need. A folder for survival duty needs a real lock (liner, frame, or back lock from a reputable maker), one hand opening, and a plain edge, and it needs your respect for its weakness: never baton a folder, never pry with one.
The allocation writes itself: quality folder in Layer 1, small fixed or stout folder in Layer 2’s pouch builds, real fixed blade in Layer 3 and vehicles.
Blade shapes, decoded
Four shapes cover the useful territory: drop point (the all-rounder this book defaults to), clip point (finer tip, slightly weaker), sheepsfoot (safety and utility, no piercing tip), and spear point (symmetric, common on small kit knives). Shape is about tip geometry, and tips are about control versus strength.
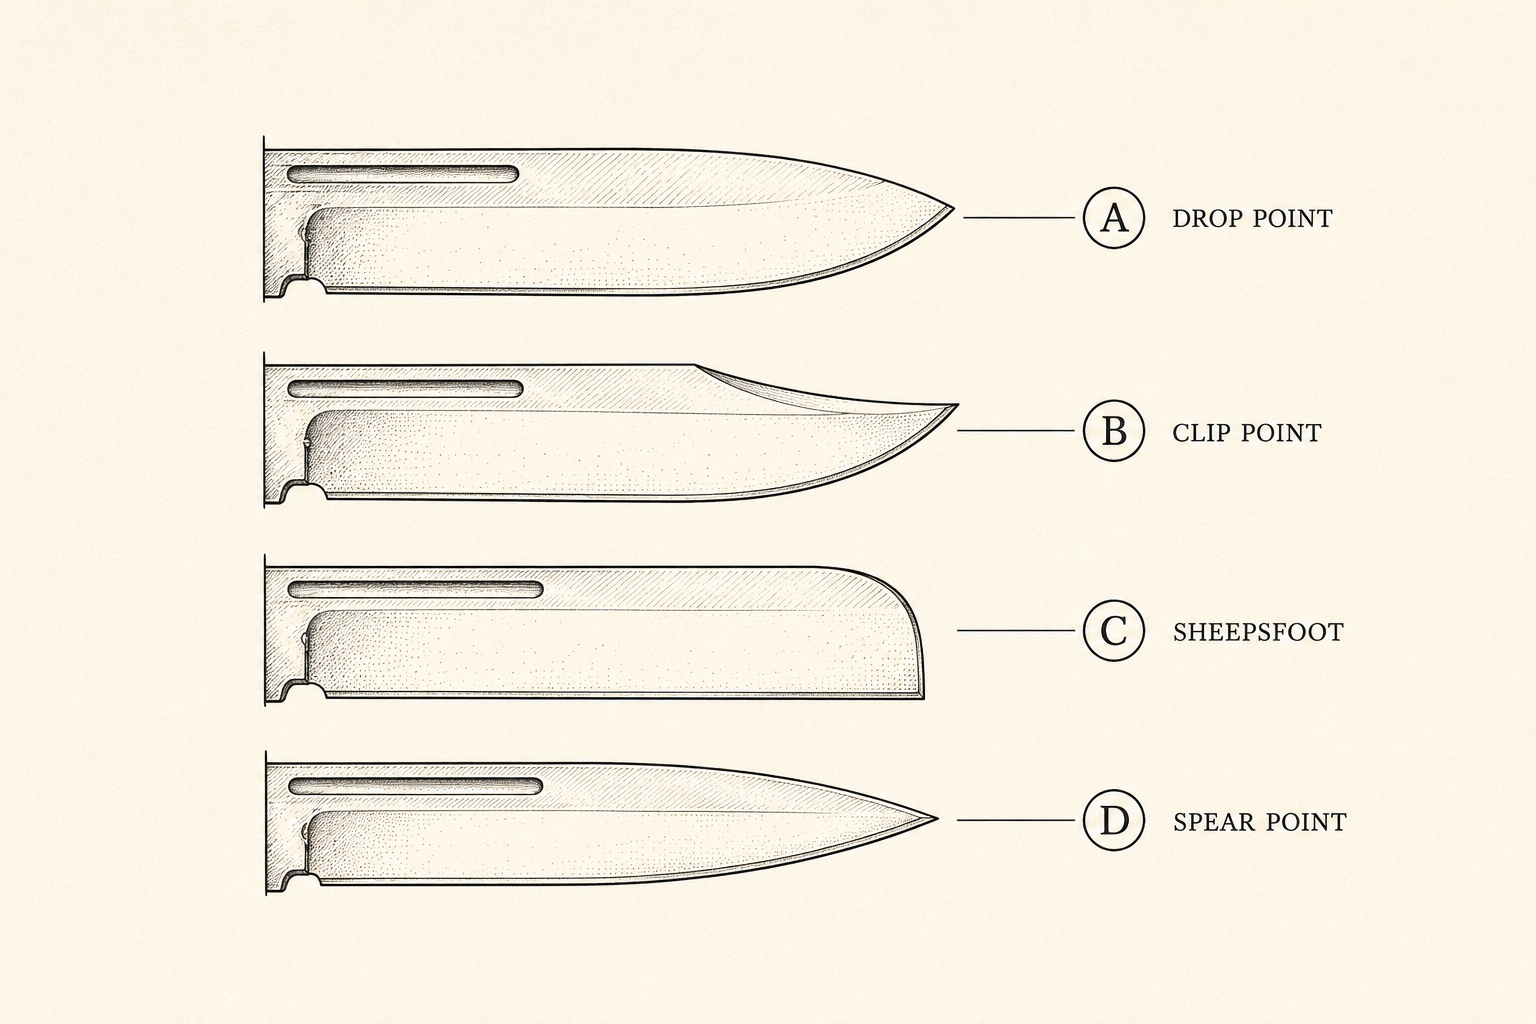
The one-line briefs: the drop point‘s gently lowered tip sits near the blade’s centerline with steel behind it, giving a strong, controllable point for game work, carving, and general abuse; it’s the shape to buy when unsure. The clip point trades tip strength for a finer, more acute point (better piercing and detail work, easier to snap). The sheepsfoot has no functional point at all, which is its feature: all edge, no puncture, favored for rescue work around bodies and rope. The spear point is the symmetric compromise on many small and multi-blade knives: fine for kit duty.
Shapes to skip for survival duty, without culture war: daggers and other double edges (illegal many places, fragile tips, no safe spine to press or baton), recurves and extreme tantos (hard to sharpen in the field), and anything whose description leans on the word “fighting.”
Steel, in one honest section
Blade steel is a three-way trade among edge holding, toughness, and rust resistance, and any named steel from a reputable maker is fine for survival use. Spend your attention on geometry, tang, and handle; spend steel anxiety nowhere.
The honest map: carbon steels (the 1095 family and kin) are tough, cheap, easy to sharpen anywhere, and rust if neglected (a working patina or a wipe of oil is their entire maintenance manual); they also throw the sparks off a ferro rod’s spine-strike best. Stainless steels (the 13%-plus chromium club) resist rust for pocket-and-marine life at slight costs elsewhere; modern mid-range stainless is genuinely good. Premium powder steels hold edges impressively for money that buys, per Chapter 6, nothing extra in survival capability.
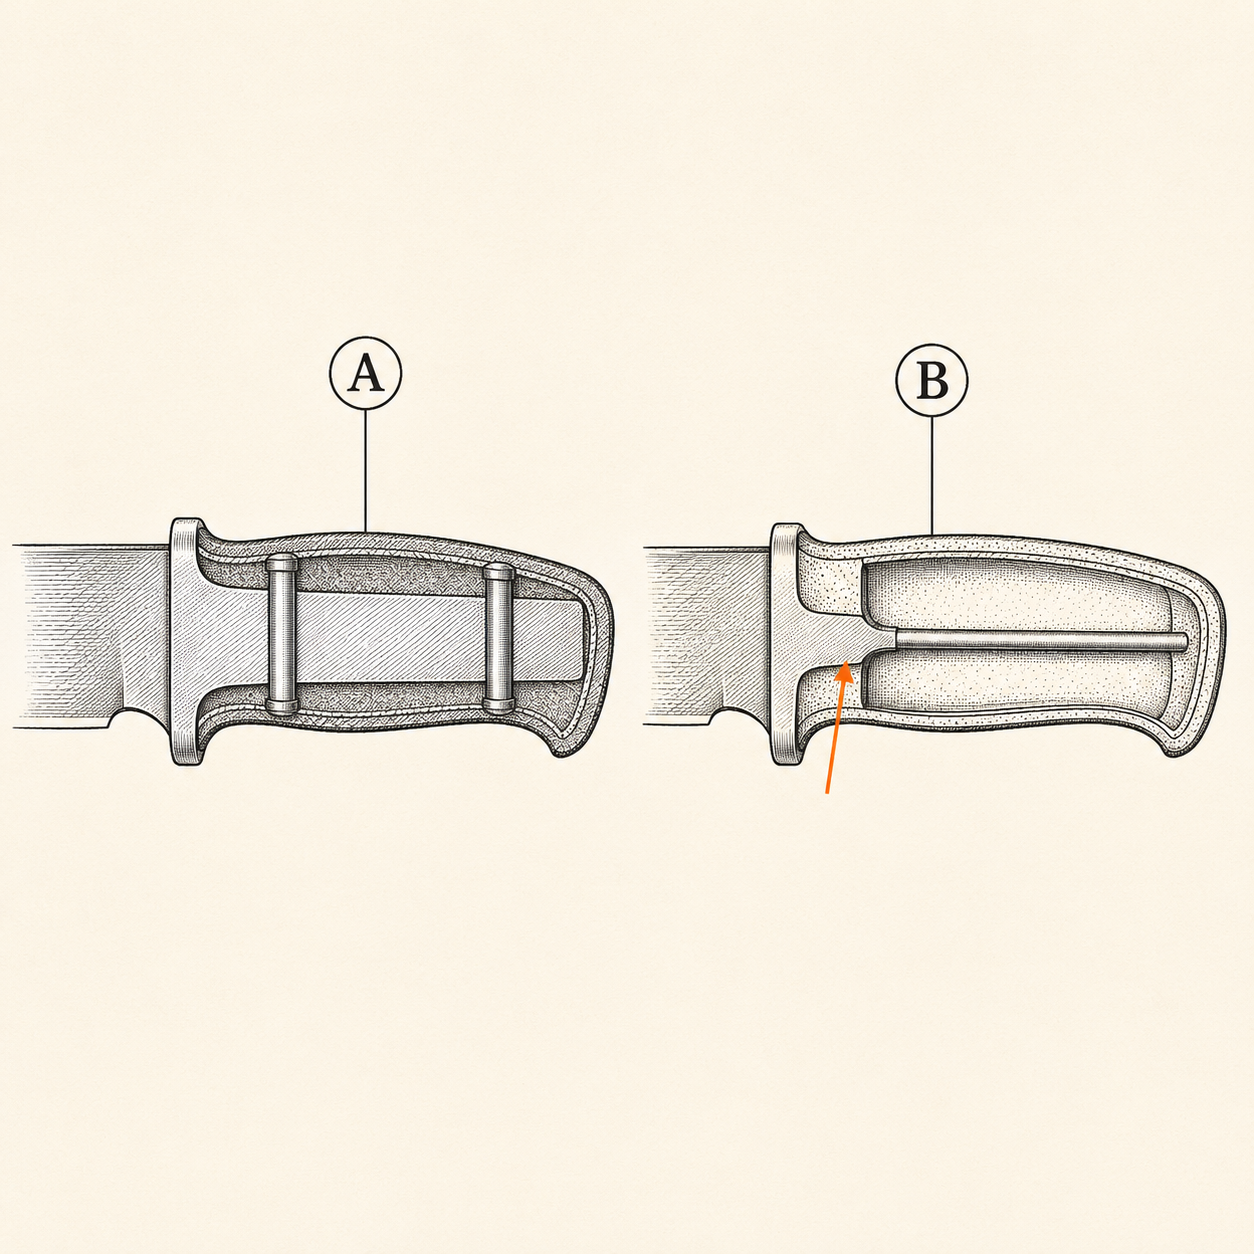
The specs that outrank steel: full tang (the blade steel continues, full-width, through the handle; look for the steel line around the handle scales or a stated spec) because tangs are where cheap fixed blades snap;
plain edge over serrations (serrations cut rope one day and defeat field sharpening forever; if you want them, take a short serrated section at most); and a 90-degree spine (a crisp, unrounded spine corner scrapes ferro rods and strikes bark shavings, saving your edge for edges).
Handles, grips, and the hand you’ll have
A survival knife’s handle must fill a cold, wet, gloved fist without hotspots, and hang on to it. Synthetic scales with grip texture and a slight guard or finger recess are the working answer; beauty is optional, retention isn’t.
The test is physical, not visual: grip the knife hard in a hammer grip, then in a reversed grip, then choke up with a thumb on the spine; anything that bites, twists, or wants to slide forward when wet fails. Materials that work: modern synthetics (glass-filled nylons, canvas laminates, rubberized composites) shrug at weather; wood and leather are lovely and want maintenance; bare skeletonized steel handles (common on Layer 2’s small knives) get a cord wrap (Chapter 22‘s guts, finally home) both for grip and for the emergency cordage joke that’s also true.
Lanyard holes earn their inclusion the first time you work over water or snow; a wrist loop of paracord is retention insurance priced at nothing. And the sheath is half the knife: it must hold through inversion-and-shake, protect the edge and you, and attach where you’ll actually wear it. A quality knife in a floppy sheath is a quality knife you’ll lose.
Small blades and the mini-kit answer
Below the pouch scale, the cutting function survives as small solutions: a quality mini folder, a flat one-piece neck knife, or replaceable blades (utility or scalpel-pattern) taped into the tin. Small knife beats no knife by the whole distance.
The tin kit’s realistic options, graded: a small locking folder (the classic keychain-class Swiss-pattern or a quality mini) does real work and passes most daily-carry filters. A neck knife (a small fixed blade, flat sheath, worn on a cord under the shirt) is a favorite Layer 1.5 answer: always-on fixed-blade capability at 2–3 in (5–7.5 cm), with Chapter 3‘s breakaway-cord safety note applying to anything worn at the throat. Loose blades (single-edge utility, hobby, or scalpel blades, edges taped) are the flattest possible answer: paired with a found or wrapped handle they cut everything a kit needs cut, and they weigh grams.
What small blades don’t do is the wood-processing résumé (batoning, heavy carving); that stays with the pack’s fixed blade. The layer principle again: capability scaled to carriage, never zero.
Care: edges, rust, and field sharpening
A sharp knife is safer than a dull one (it cuts where aimed with less force), and field sharpness is maintenance, not restoration: a pocket stone or rod touching up the edge before it’s truly gone. Carry a small sharpener at pack scale; learn the burr; strop on what’s handy.
The five-minute skill: hold the factory angle (roughly 20 degrees per side on most working knives), stroke edge-into the stone alternating sides, feel for the burr (the tiny wire of steel that forms opposite the side you’ve ground, the proof you’ve reached the edge), then remove it with light alternating passes. Pocket diamond plates and ceramic rods do this anywhere; the unglazed rim of a mug does it in kitchens, a smooth river stone does it in a pinch, and stropping on a belt or pack strap polishes the result.
Rust doctrine matches steel choice: carbon blades get wiped dry and oiled (any oil; food oils are fine on food knives) and wear their gray patina proudly; stainless asks only to not be stored wet in leather (sheath moisture is the classic stainless-stains-anyway story). Storage rule for all: dry knife, dry sheath, checked on Chapter 41‘s calendar like everything else.
The buying guide, condensed
Spend $40–100 on the primary fixed blade and $25–60 on the daily folder from established makers, and you’ve bought all the knife survival requires. The table below is the whole decision:
| Layer | The blade | Non-negotiables |
|---|---|---|
| Layer 1 daily | Locking folder, 2.5–3.5 in (6–9 cm), plain edge | Real lock, one-hand open, legal where you live |
| Layer 2 tin/pouch | Mini folder, neck knife, or taped utility blades | Any edge beats none; tape the loose ones |
| Layer 3 pack | Fixed blade, 3.5–4.5 in (9–11 cm), full tang, drop point | 90° spine, grippy handle, sheath that holds |
| Vehicle | Stout fixed blade or the retired previous pack knife | Plus the pry bar so nobody pries with a knife |
| Home | Whatever the kitchen already proves you’ll maintain | Honesty beats aspiration |
Chapter 6‘s counterfeit rules apply doubled (knives are a flagship fake category), and one anti-recommendation repeats for emphasis: the hollow-handle “survival knife” with the compass pommel and the kit inside is a movie prop with a stub tang; the handle full of matches costs you the blade the first hard use. The kit goes in the kit; the knife is the knife.
Pack This Chapter
- Fixed blade for strength (full tang, 3.5–4.5 in / 9–11 cm, drop point, plain edge, 90° spine); folder for presence (real lock, one-hand, legal). Carry both across layers.
- Shape is tip geometry: drop point default, clip for finesse, sheepsfoot for pointless safety, spear for small kits. Skip double edges and drama.
- Any reputable named steel is fine; carbon sparks ferro rods and wants oil, stainless forgives neglect. Geometry, tang, and handle outrank metallurgy.
- Handles must hold a cold wet fist; sheaths must hold the knife. Small layers get neck knives, mini folders, or taped utility blades.
- Sharp is maintenance: pocket stone, factory angle, find the burr, strop. $40–100 buys the whole requirement.
Where Kits Fail
- The safe-queen fixed blade. Magnificent, and at home. The folder in your pocket is the knife that exists.
- Batoning the folder. Pivots and locks aren’t tangs. Wood processing belongs to one-piece steel.
- The hollow-handle prop. A stub tang wearing a survival costume. The kit rides in the kit.
- Dull-knife bravado. Dull blades slip, and slips are Chapter 26‘s business. The pocket stone weighs an ounce.
Frequently asked
What’s the best all-around survival knife?
A full-tang fixed blade, 3.5–4.5 in (9–11 cm), drop point, plain edge, synthetic grippy handle, solid sheath, from any established maker at $40–100. That configuration carves, batons, processes food, and scrapes a ferro rod off its 90° spine. Past that spec, you’re buying preference, not capability.
Is a drop point or clip point better?
Drop point for survival duty: its tip carries more steel and sits near centerline, so it survives prying, carving, and clumsy moments. Clip points pierce and do fine work slightly better at the cost of a more fragile tip. When unsure, drop point is the answer that never embarrasses.
Do I need a fixed blade if I carry a folder?
For pocket-scale life, the folder covers you. For pack-and-beyond scenarios (processing wood, shelter building, hard field work) the fixed blade’s one-piece strength earns its place: no pivot to fail, no lock to trust with your fingers. The system answer is the folder on you, the fixed blade in the pack.
What knife steel should I look for?
Any named steel from a reputable maker suffices for survival work. Carbon steels sharpen easily anywhere, spark ferro rods well, and want a wipe of oil; modern stainless forgives wet neglect. Put your attention on full tang, plain edge, and handle grip; steel snobbery buys nothing out here.