What makes a good survival kit container?
A good container is sized for how you’ll carry it, sealed against water, tough enough to live in a pocket or trunk for years, and honest: full means done. Bonus points if the container itself does survival work.
People treat the container as packaging. It isn’t. The container decides whether the kit gets carried (size and shape), whether the contents work after a year of rain and pocket lint (seal), and whether the kit survives being sat on, dropped, and frozen (durability). It even sets the kit’s discipline: a fixed volume forces the ruthless choices that make small kits good, while a soft expandable bag quietly absorbs junk until it’s a heavy bag of maybes.
The best containers also multitask. A metal tin boils water. A clear pouch shows you the contents without opening the seal. A bright case gets found in leaf litter where a camo one vanishes. When two containers tie on everything else, pick the one that does a second job.
The three tests
Before any container gets your gear, run three tests: the pocket test (will you actually carry it there?), the seal test (does water stay out?), and the cook test (can any part of it survive heat?). Two passes out of three is a usable container; know which one it failed.
The tests take ten minutes and settle most arguments. For the pocket test, load the empty container with pocket change to rough weight and carry it where the kit will live for two days; your body will file its report. For the seal test, load it with a dry paper towel, submerge it in a sink for ten minutes, and read the towel. For the cook test, be honest about materials: bare metal passes, plastic and fabric fail, and a failed cook test just means your kit needs foil or a metal cup inside (Chapter 15).
Run the seal test again once a year. Gaskets age, hinges loosen, and zippers wear, and the sink finds it before the storm does.
Metal tins
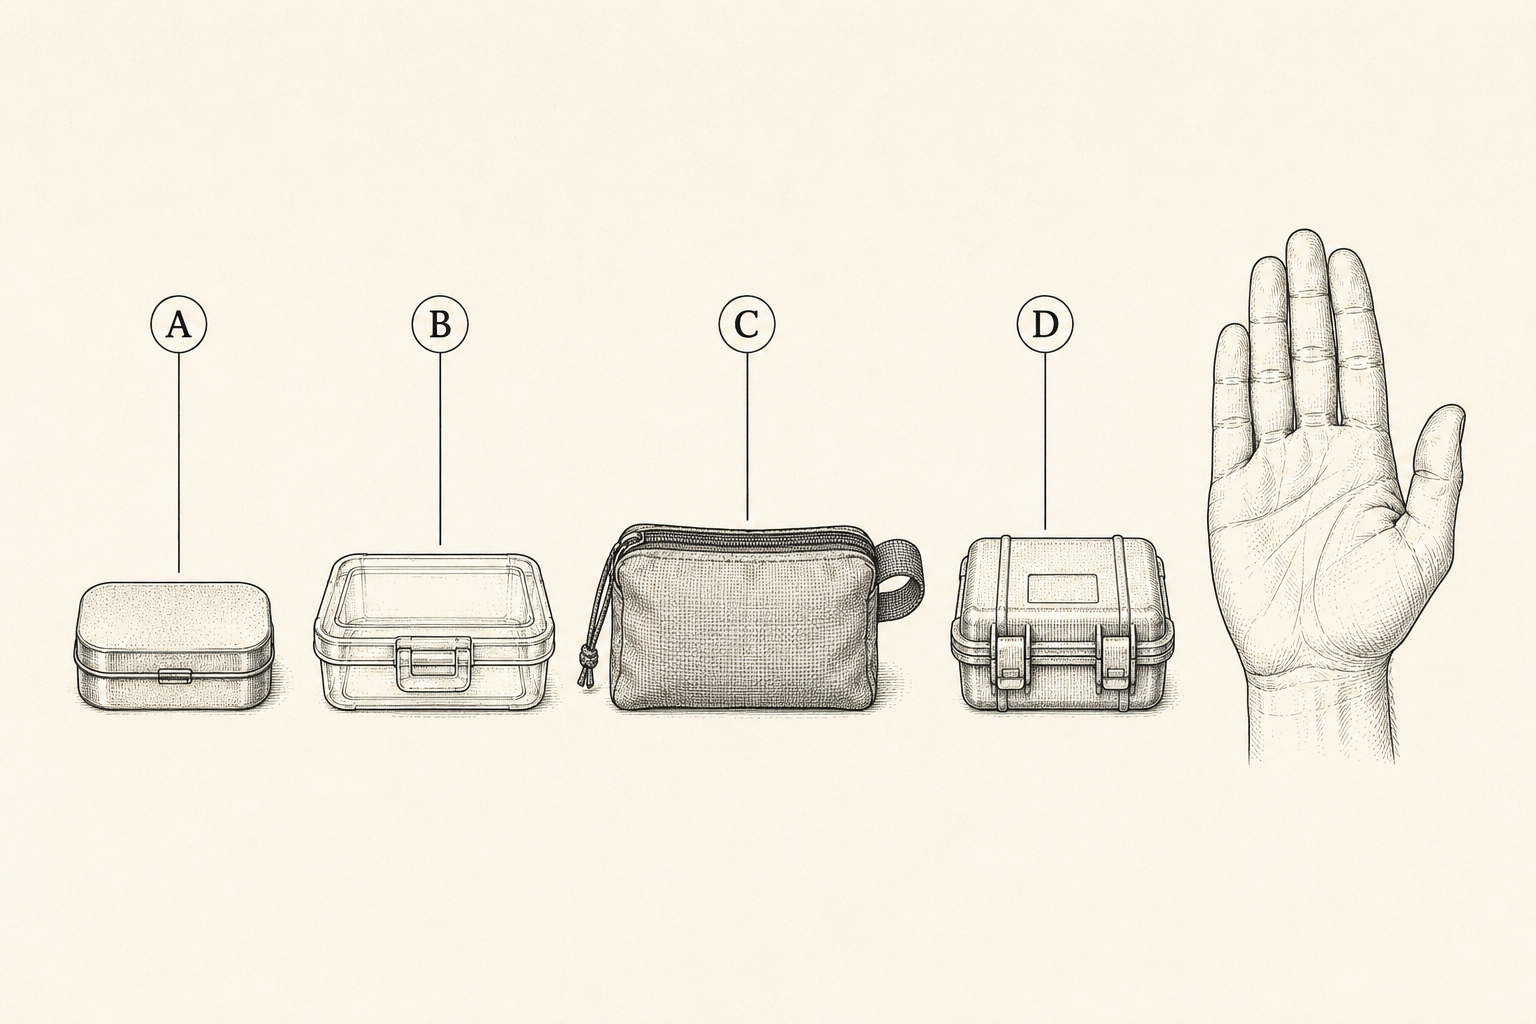
The hinged metal tin is the classic pocket-kit container because it’s flat, tough, pocket-shaped, and doubles as cookware and more. For Layer 2 kits it’s still the recommendation.
The tin’s résumé is long. It boils small amounts of water (tea-mug amounts, but tea-mug amounts purify). Its polished inner lid works as a backup signal mirror. It’s crush-resistant in exactly the flat dimension pockets abuse. It costs nothing, since candy and tobacco tins are everywhere once you start looking. And its fixed, small volume is the design constraint that makes tin kits famously well-edited.
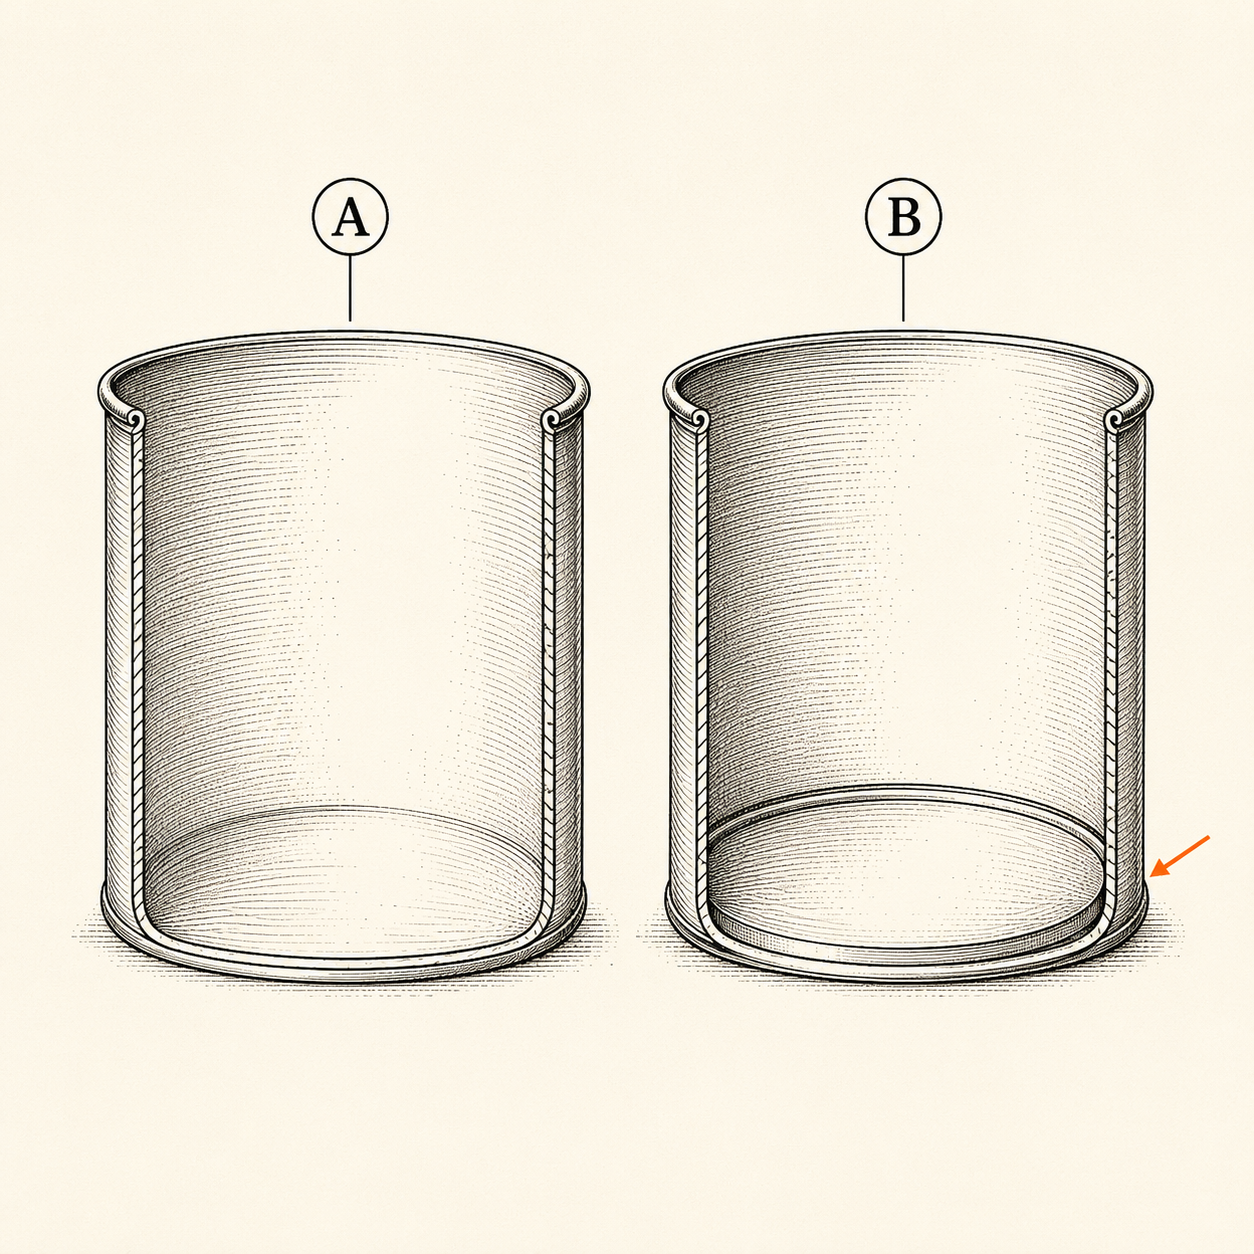
Two picky details separate a good tin from a poor one. First, the bottom: you want a one-piece drawn body, where base and walls are a single piece of metal. Some tins have a pressed-in false bottom with a seam around the base, and that seam weeps when you try to boil in it. Look inside; a one-piece body has no ring seam at the floor. Second, the lid: friction-fit lids loosen with wear. Neither detail is fatal (a taped seam fixes a loose lid, and a false-bottom tin still makes a fine dry box), but know what you’re holding before you rely on it.
Rigid plastic: boxes, vials, and repurposed cases
Rigid plastic containers are the budget workhorses: light, cheap, often clear, and completely rustproof. They give up the tin’s boilability and, below a certain quality, they crack.
The clear lid is a genuinely useful feature, not a gimmick: you can audit the kit at a glance without breaking the tape seal, which means audits actually happen. Waterproof “dry boxes” with gaskets punch far above their price for water sports and coat pockets. And the repurposing world is wide open here: soap dishes, glasses cases, wipes boxes, and prescription vials have all served honorably. The scrounger’s rule is simple: stiff walls, a lid that latches rather than merely rests, and no brittleness (cheap clear polystyrene snaps in cold weather; polypropylene and similar flex instead of cracking).
Vials deserve a special mention as sub-containers: waterproof screw-cap vials organize a kit’s smallest contents (tablets, hooks, matches) inside any larger container, and a labeled vial is the difference between a kit and a junk drawer.
Soft pouches and organizers
Soft containers (zip pouches, belt pouches, roll organizers) trade crush protection for shape, comfort, and organization. They’re the right call the moment a kit outgrows pocket-flat.
Fabric conforms to bodies and bag corners in a way boxes can’t, which is why Layer 2.5-size kits (too big for a tin, smaller than a pack) almost always end up in a pouch. The organizer styles with sewn dividers or fold-out panels solve the real failure mode of soft kits, which is everything migrating to the bottom in a tangle. If you’ve ever dumped a whole bag to find one item with cold hands, you’ve met the problem the dividers solve.
Two specs matter beyond fabric toughness. Zippers are the wear item: big-toothed zippers survive grit and gloves that fine ones don’t. And water resistance in fabric is a claim about minutes, not hours; assume soaked and bag the vulnerable contents inside (a freezer zip bag per category is the classic move, and the bags themselves are multi-use kit items per Chapter 27).
Hard waterproof cases
Gasketed hard cases are the top of the protection ladder: waterproof, crushproof, and floaty. They’re the default for boats, paddling, and any kit that will be thrown, dropped, or submerged rather than merely rained on.
These are the cases with an O-ring in the lid and latches that cam shut, sold in sizes from “deck of cards” to “checked luggage.” Two details reward attention. First, real waterproof cases often include a pressure-relief valve or button; air pressure changes from altitude or temperature can otherwise vacuum-lock a sealed case shut exactly when your hands are cold. Second, buy bright colors for anything that can be dropped in water or brush. Field-toned gear is stylish right up until it’s lost.
The costs are honest ones: hard cases are the heaviest and bulkiest option per unit of storage, and their rigid shape fights pockets and pack corners. Reserve them for the environments that justify the armor.
Wearable and improvised containers
Some of the best containers aren’t boxes at all: a paracord bracelet, a loaded belt pouch, a water-bottle carrier with pockets, or two feet of heavy-duty aluminum foil folded into a sealed packet around its own contents.
Wearables push capability inward toward Layer 1, which the system always rewards. A woven paracord bracelet is 8–10 ft (2.4–3 m) of cordage you can’t forget at home; modern versions weave in a buckle whistle or a ferro-rod toggle. A bottle carrier turns hydration errands into a small kit that happens to hold water.
The foil packet is the improvisation worth knowing: fold a doubled sheet of heavy-duty foil into an envelope around a micro-kit’s contents and you have a container that is itself a reflector, a cup mold, and a dry wrap. It proves the chapter’s point from the cheap end: the container is never just a box; it’s the first component you pick.
Match the container to the layer
Every layer has a natural container family: tins and pouches for pockets, organizers and packs for Layer 3, duffels and boxes for Layer 4. Fighting the pairing usually means the kit stays home.
This is the chapter’s cash-out, so here it is as a table:
| Layer | Container family | Why |
|---|---|---|
| Layer 2 pocket kit | Hinged tin or flat dry box | Pocket-flat, sealed with tape, boilable if metal |
| Layer 2.5 belt/bag kit | Zip pouch or small organizer | Conforms, organizes, rides on a belt or in any bag |
| Layer 3 pack kit | The pack itself + pouch modules | Modules keep functions findable inside a big bag |
| Vehicle kit | Soft duffel + one hard case | Duffel grabs fast; hard case armors the fragile few |
| Water sports | Gasketed hard case or dry bag | Submersion is the design case, not rain |
The vehicle pairing deserves the emphasis: loose supplies rolling around a trunk are not a kit. One duffel you can lift one-handed, packed so the grab-and-go core is on top, turns Layer 4 from storage into equipment.
Pack This Chapter
- The container decides carry, seal, and survival. Choose it as seriously as any component.
- Run the three tests: pocket, seal (sink and paper towel), cook. Retest the seal yearly.
- Pocket kits: hinged one-piece metal tin, seam taped. Check the floor for a ring seam before trusting it near flame.
- Soft pouches for conforming carry, hard gasketed cases for submersion and abuse, bright colors for anything droppable.
- One duffel in the trunk beats a trunk full of loose good intentions.
Where Kits Fail
- The heroic container, unpocketable. A gorgeous hard case that rides in no pocket protects no one. Pocket test first, always.
- The false-bottom boil. A ring-seam tin over flame weeps into the fire. Look at the floor before the day you cook in it.
- Fabric trusted as waterproof. Pouches shrug off rain for minutes, not hours. Freezer bags inside, always.
- The vacuum-locked case. Altitude sealed it; cold fingers can’t break it. Buy cases with a purge valve, or crack the lid before storing.
- Camouflage everything. Field-toned kits vanish where they’re dropped. The container’s second job is being found.
Frequently asked
What’s the best container for a small survival kit?
A hinged metal tin with a one-piece drawn body, its seam wrapped with electrical tape. It’s flat enough for real pockets, tough in the dimension pockets abuse, and the tin itself boils water and signals. A clear waterproof dry box is the runner-up when you want a gasket and visible contents.
Are Altoids-style tins actually good for survival kits?
Yes, with two caveats. The friction lid needs a tape seal to keep water out, and the small volume forces hard choices about contents. Both caveats are features in disguise: the tape keeps the kit intact, and the constraint produces the disciplined little kits that actually get carried. Chapter 30 builds one item by item.
How do I waterproof a survival kit?
In layers, because no single barrier survives years of carry. Seal the container’s seam with a wrap of electrical tape, bag moisture-sensitive contents inside it (freezer zip bags or laminated pouches, one per category), and choose gasketed containers for anything that might be submerged rather than merely rained on. Then verify the whole stack: ten minutes in a sink with a paper towel inside tells no lies.
Can a survival kit container be too big?
Easily, and it’s the most common container mistake. Volume invites contents, contents add weight, and weight is why kits stay home. Pick the container for the carry method first (pocket, belt, pack corner), and let capability fit inside that boundary instead of the other way around.