What navigation gear does a kit need?
A compass in every layer (a button compass in the tin, a baseplate compass in the pack) and a paper map of your area, because the phone from Chapter 19 is brilliant until it’s dead, wet, or cold. The needle needs no battery, and that’s the whole argument.
Navigation in a kit serves two different jobs, and naming them clarifies every purchase. Job one is orientation: knowing roughly which way is which, so panic doesn’t walk you in circles. A thumb-size button compass does this completely. Job two is wayfinding: moving deliberately from here to a chosen there, which wants the baseplate compass, a real map, and the skills this chapter sketches.
Skills, plural, is the honest word. This chapter teaches gear selection and the core techniques a kit assumes; fluency comes from practicing them on ground you know (Chapter 40 schedules it). A compass you can’t use is a fidget toy that points north.
The button compass: orientation insurance
A 20 mm liquid-filled button compass turns “which way is the road?” from a guess into a fact, in a package that vanishes into any tin. Buy quality (liquid-damped, from a real maker) or the insurance is fake.
The button compass’s virtue is presence: it’s small enough to live in Layer 2 forever, on a zipper pull, in a watchband slot. Its capability is honest: direction, held steady enough to walk a line. The lost-person research is consistent that unaided humans can’t walk straight in featureless terrain or low visibility (we drift toward a circle without external reference), and a fifty-cent-size needle deletes that failure completely.
Quality is the trap. Liquid damping is mandatory (an undamped needle swings forever, and a bubble-damaged capsule lies), and toy-tier compasses from mystery marketplaces fail Chapter 6‘s tells in a category where being wrong is worse than being absent. Test any button compass against a known direction (or your phone, while it’s alive) the day it arrives.
The baseplate compass: the real instrument
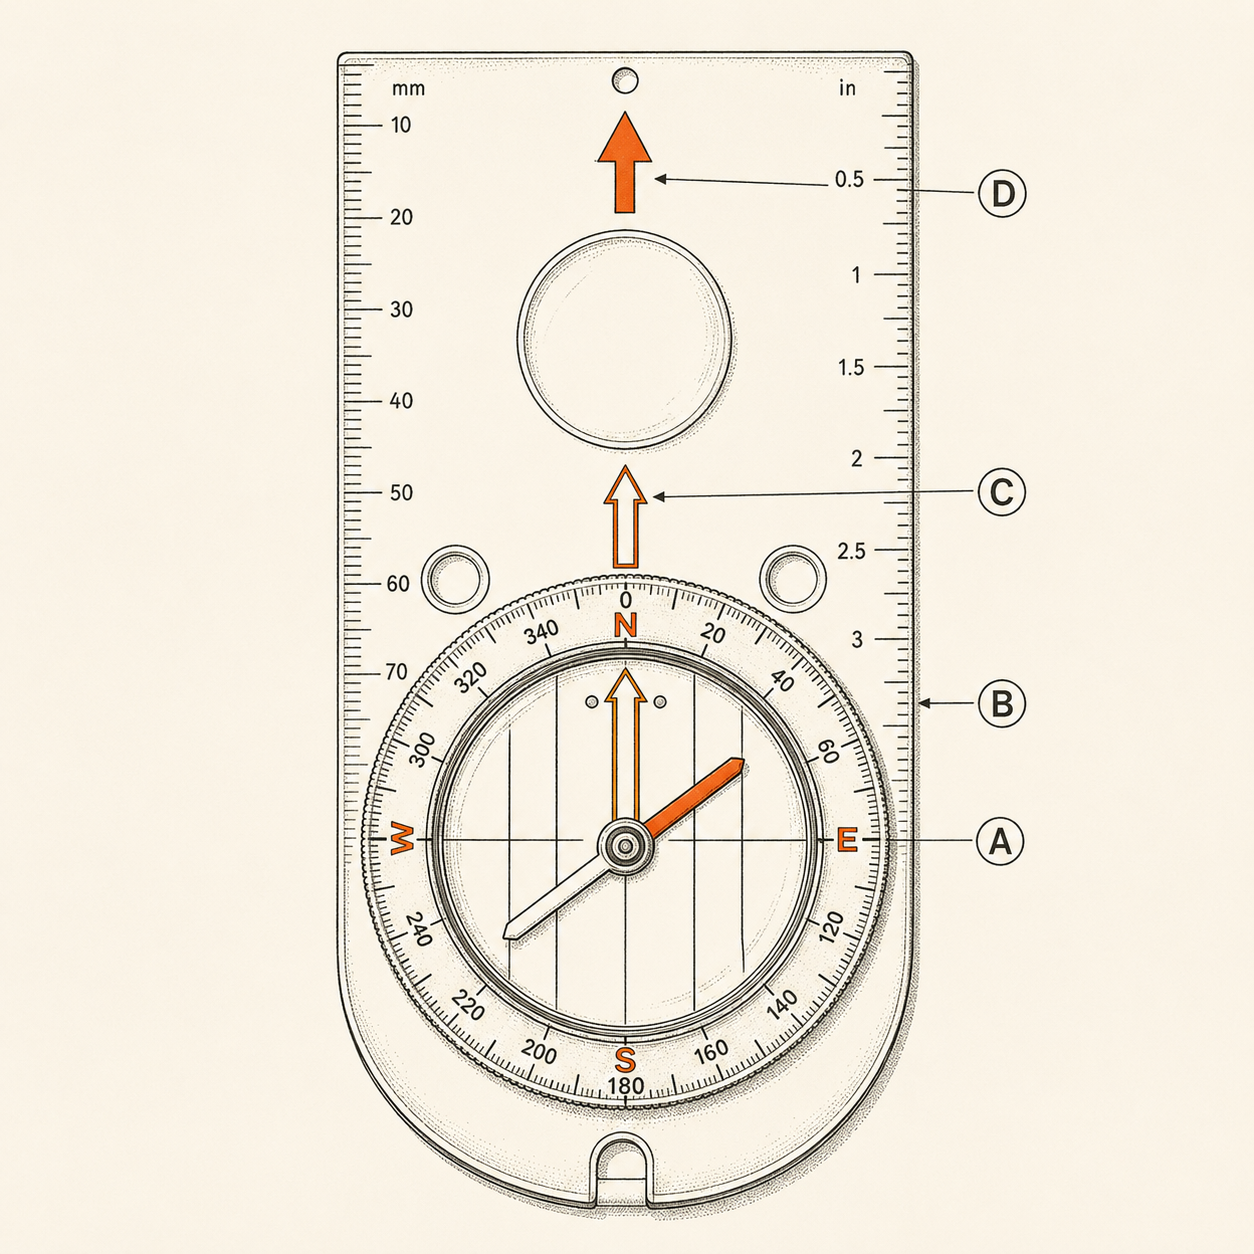
A baseplate compass (a damped needle in a rotating dial mounted on a clear ruler-edged plate) is the pack’s navigation instrument: it takes bearings from the world, transfers them to and from a map, and costs less than dinner. Choose one with adjustable declination.
The anatomy in one pass: the needle finds magnetic north; the rotating bezel marked in degrees captures a bearing; the orienting arrow and lines inside the bezel mate the compass to a map’s grid; the direction-of-travel arrow on the plate points where you’re going; the clear plate itself rules straight lines and measures map distance. Nice-to-haves that earn their cost: adjustable declination (below), a small magnifier, and luminous points for dusk work. Mirrors and clinometers are fine features you can ignore until a specific need finds you.
Two field techniques deliver most of the value:
- Hold a bearing. Point the travel arrow at a distant landmark on your intended line, twist the bezel until the orienting arrow boxes the needle (“red in the shed”), and walk landmark to landmark. Fog or dark? Walk needle-boxed on short legs.
- Take a back bearing. Before leaving a road, camp, or vehicle, sight back at it and note the reverse direction. Now “return” is a number, not a memory.
Declination, without tears
Magnetic north and map north differ by an angle called declination, which varies by location (from near zero to 15–20°+ across North America) and drifts over years. Set it once on an adjustable compass and the problem disappears.
The error is worth respecting with one concrete number: walking one degree off drifts you about 92 ft per mile (17.5 m per km), so a 15° declination ignored is roughly a quarter mile of error after one mile of travel: the difference between the trailhead and unfamiliar drainage. Current declination for your area is printed on recent maps (older maps’ values age) and available from official geomagnetic sources; the mainstream mapping apps state it too.
The adjustable-declination compass reduces all of this to a one-time screw adjustment: set your region’s value, and the compass reads true bearings that match your map forever after (readjust when you travel far or after some years). Fixed compasses force you to add or subtract on every reading, which is exactly the arithmetic a cold, stressed brain botches. This book’s recommendation stands: pay the few extra dollars; retire the mental math.
Reading a topographic map
A topographic map draws the land’s shape with contour lines: each line is constant elevation, tight spacing means steep, and the shapes name the terrain (V’s point upstream, circles cap summits). Ten minutes of contour literacy makes every map in your kit speak.
The core grammar: contour interval (the elevation step between lines, printed in the legend) sets the vertical scale; spacing is slope at a glance (crowded lines are cliffs, sparse lines are flats); closed circles are hilltops; V-shapes crossing streams point uphill (upstream); U-shapes are ridges pointing downhill. Add the human layer (trails, roads, buildings) and the water layer (streams run downhill and eventually toward people, an old navigation truth with real exceptions in swamp, canyon, and grizzly country), and a map becomes a decision tool: which drainage leads out, which ridge breaks your wind, where a road must lie.
Kit specifics: carry the map for where you actually are (printed at home or bought), folded to show your area, in a zip bag or map case; a map wet through is papier-mâché. Scale sweet spot for foot navigation is around 1:24,000 (the U.S. quad standard); road-trip scales live in the vehicle.
The techniques that find you
Three skills locate and move you without electronics: orienting the map to the world, triangulating your position from two landmarks, and using handrails and catch features so precision stops mattering.
Orient the map: set the compass to north, lay it on the map, and rotate both until the needle boxes and the map’s north matches the world’s. Now the map is a window, not a diagram; peaks line up with their drawings.
Triangulate: take bearings to two identifiable features (a summit, a tower), draw each back-bearing line on the map from that feature, and your position is where the lines cross (a third line makes a small triangle of truth).
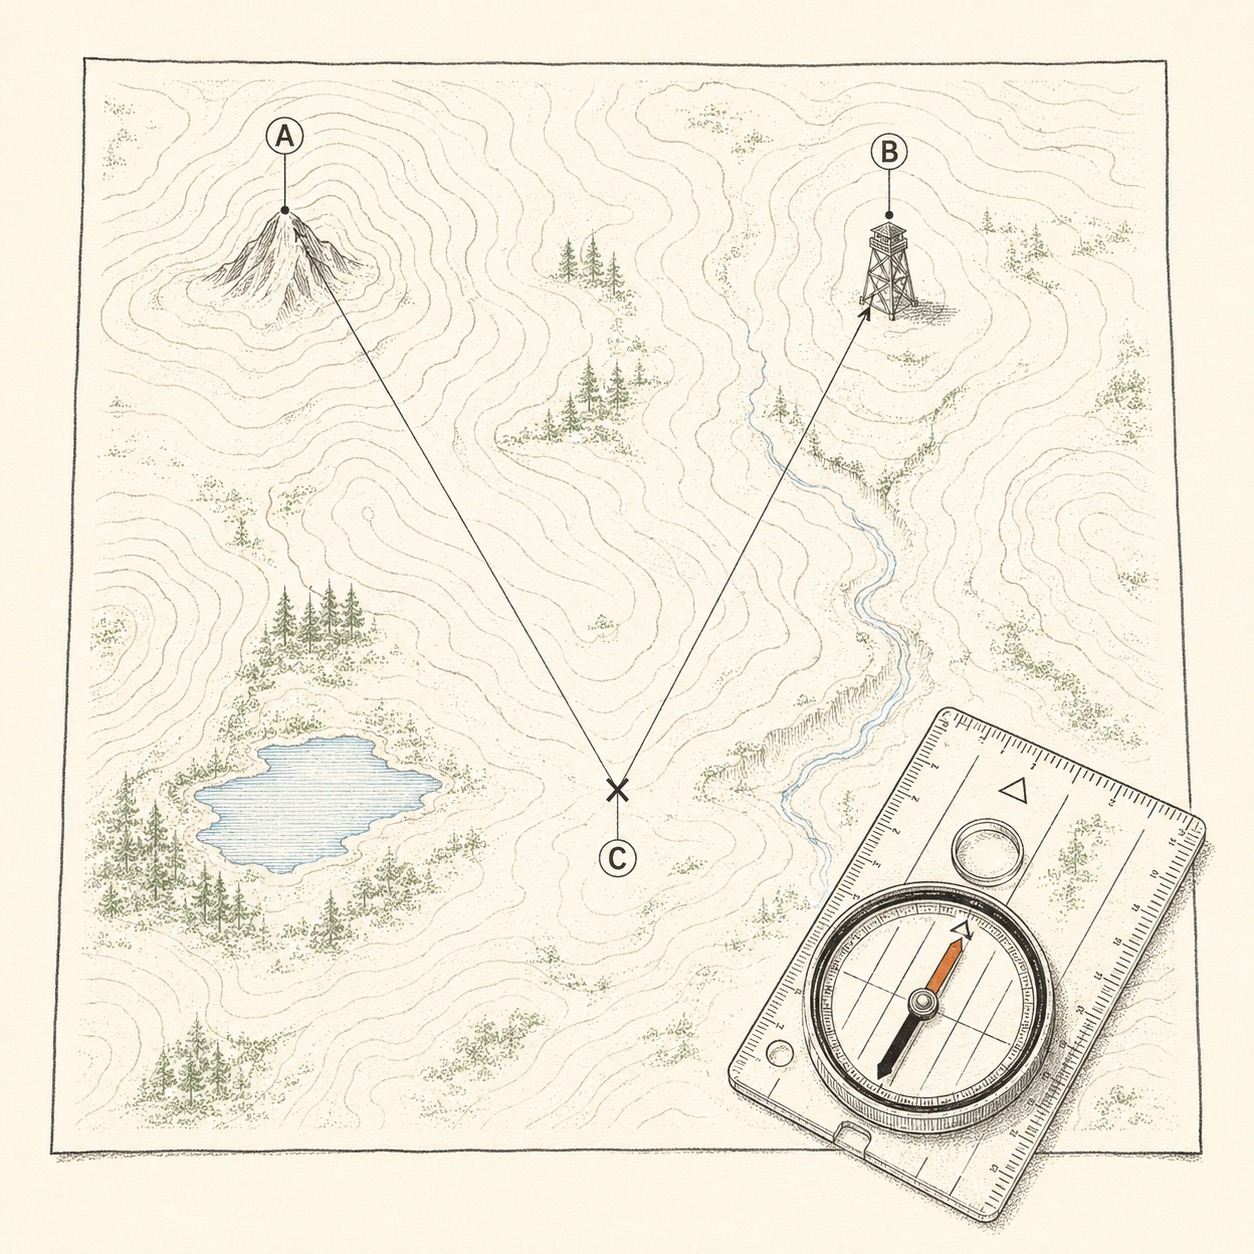
This is the skill that converts “lost” to “found” with zero batteries.
Handrails and catches: navigate like a pessimist. Follow linear features (streams, ridgelines, roads) as handrails; aim off on purpose (aim deliberately left of the car, so hitting the road you know to turn right); and pick a catch feature (a river, a highway) behind your target that makes overshoot impossible to miss. These habits make ordinary-quality navigation reliably safe, which beats fragile precision.
Pace, time, and dead reckoning
Distance is data. Know your pace count (steps per 100 m or 100 yd) and travel time per mile, and you can navigate by bookkeeping when visibility drops to nothing.
Calibrate once on a known distance: count double-steps (every left foot) over a measured 100 m; most adults land near 60–70, more uphill, in snow, or at night. With a pace count, a bearing, and a notepad (Chapter 27 packs one), fog and darkness become manageable: walk the bearing, count the legs, log the turns. Ranger beads (a cord of sliding beads, one slid per hundred) do the counting when your head is busy; a knotted cord improvises the same.
Time is the coarser twin: fit adults cover roughly 2–3 mph (3–5 km/h) on trail, roughly half that off-trail, with elevation slashing it further. The planning habit that saves people: note the time you leave a known point. “Ninety minutes up this drainage” plus a map is a position estimate; “sometime this afternoon” is a search area.
Kit allocation
Navigation by layer: a button compass rides in the tin, a set-declination baseplate plus local paper map in the pack, and the phone plus a road atlas in the vehicle. Nothing here fights Chapter 19‘s electronics; it backstops them.
The redundancy pattern deserves its explicit sentence: the phone (with offline maps, next chapter) is genuinely the best navigation instrument most people have ever owned, and this chapter exists because its failure modes (battery, cold, water, drops) all cluster in emergencies. The needle-and-paper layer is the one that cannot die together with it. Ten dollars of button compass and a printed quad is the entire premium.
One more allocation: skills per layer. Orientation (which way is north, which way is out) is a Layer 1 skill everyone in the household can learn in an afternoon. Wayfinding (bearings, triangulation, contours) is the pack-carrier’s craft. Match the teaching to the layer like everything else.
Pack This Chapter
- Two navigation jobs: orientation (button compass, everywhere) and wayfinding (baseplate + map + skills, in the pack).
- Buy liquid-damped quality; test against known north on arrival. Adjustable declination retires the arithmetic that stressed brains botch.
- One degree off is ~92 ft per mile (17.5 m per km); declination ignored is real distance lost.
- Core skills: box the needle and walk landmarks; back-bearing before leaving anything; orient the map; triangulate from two features; handrail, aim-off, catch.
- Pace count and departure times turn fog into bookkeeping. Paper lives in a zip bag, folded to here.
Where Kits Fail
- The compass nobody boxed. Owned for years, never once used to hold a line. Ten practice minutes in a park is the whole cure.
- Declination as trivia. Fifteen degrees “close enough” is a quarter mile per mile of wrong. Set it on the tool, once.
- A map of somewhere else. The regional atlas at hiking scale navigates nothing. Carry the quad for where your boots are.
- Bubble in the capsule. A damaged compass lies with confidence. Inspect after hard knocks and heat; replace liars.
Frequently asked
How do you use a compass for beginners?
Start with one skill: hold a bearing. Point the baseplate’s travel arrow at a distant landmark along your route, rotate the bezel until the orienting arrow boxes the red needle, then walk landmark to landmark, re-boxing as you go. That single technique, practiced in a park, is most of practical compass use.
What is magnetic declination and do I care?
It’s the angle between magnetic north (where the needle points) and true north (how maps are drawn): near zero in some regions, 15–20°+ in others, drifting slowly over years. You care because each ignored degree is ~92 ft (17.5 m per km) of drift per mile. An adjustable-declination compass makes it a one-time setting.
Are button compasses accurate enough to matter?
For their actual job, yes. A quality liquid-damped button compass reliably tells you which way is north and lets you hold a straight line, which defeats the circular wandering that gets lost people more lost. Precision bearings belong to the baseplate; presence belongs to the button.
How do I find my location with a map and compass?
Triangulate: identify two visible mapped features, take a bearing to each, convert to back bearings, and draw each line on the map from its feature. You are where the lines cross; a third bearing tightens it to a small triangle. Practice once on a viewpoint you know and it stops being intimidating.