What shelter can a kit actually carry?
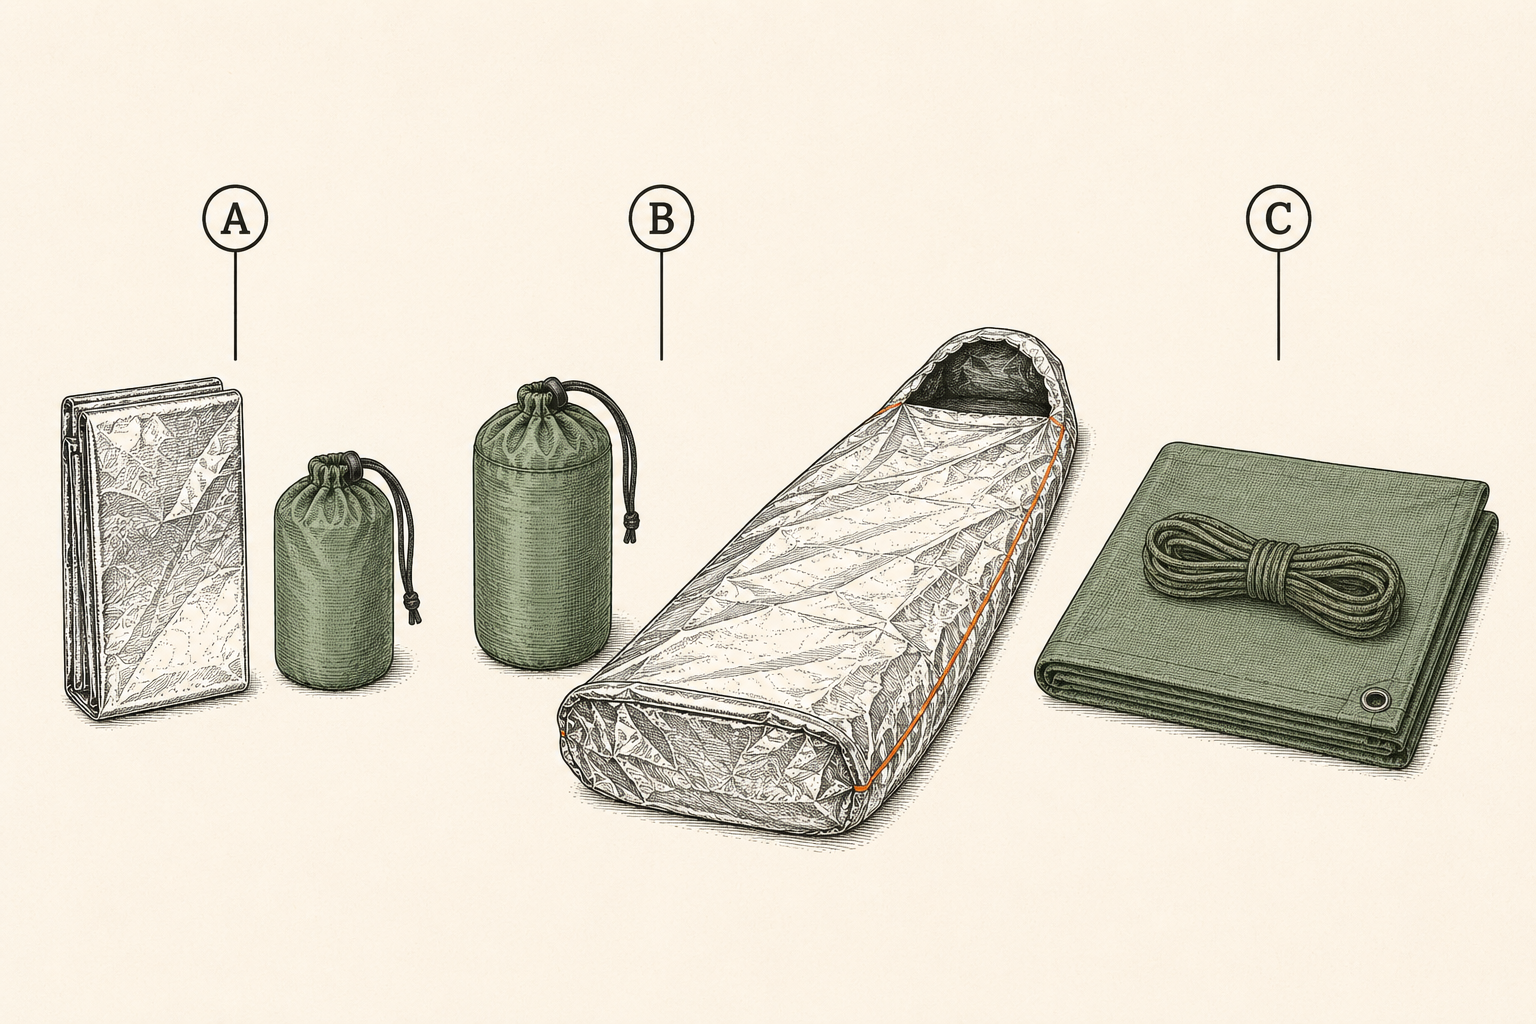
A layered answer: a mylar blanket in every kit down to the tin, an emergency bivvy or heavier blanket at pack scale, and a tarp with cordage where weight allows. None of it is a tent; all of it is heat management, which Chapter 2 taught is what shelter means.
Recall the enemy list: conduction, convection, radiation, evaporation. Carried shelter fights them in order of deadliness per ounce: something windproof and rainproof (convection and the wet that powers evaporation), something reflective or insulating (radiation and general loss), and something under you (conduction, the quiet thief). Every product in this chapter is a packaging of those three answers, and choosing among them is mostly choosing your weight budget.
One framing before the gear: in a survival night, shelter is a system you assemble: site plus structure plus insulation plus your own dry layers. The envelope in your kit is one component. The chapter ends with the assembly.
The mylar blanket: minimum viable shelter
The mylar emergency blanket blocks wind, sheds rain, and reflects a large share of your radiant heat back at you, in a package the size of a phone and the weight of a granola bar. Its job is one bad night, and its limits are part of its design.
Chapter 2‘s calibration deserves repeating here as doctrine: mylar doesn’t warm you; it returns heat you’re already losing and stops the wind and wet from taking more. Used well (draped loose over insulation, tucked against wind, reflective side toward you) it converts a dangerous night into a miserable one, which is the entire job description. Used badly (wrapped tight against wet cotton on cold ground) it disappoints, because conduction and evaporation were never its department.
Its limits: it’s fragile (one tear runs the sheet; handle like foil, not fabric), it’s a one-use item in practice (refolding is origami punishment; carry two), it’s loud in wind, and it’s a vapor barrier (your sweat stays inside; vent it). Its bonus lives: Chapter 16‘s signal panel (staked flat, it’s a bed-size mirror), rain catcher, shade roof (reflective side out, per Chapter 4), and ground sheet under better shelter.
The bivvy upgrade
An emergency bivvy is the mylar idea rebuilt as a bag in tougher, quieter, reusable material: crawl in, and convection is defeated in every direction at once. It’s the single best shelter upgrade per ounce in this book.
The bag shape is the insight: a blanket must be held closed against wind (by hands that have other jobs), while a bag simply is closed. Modern emergency bivvies in metallized polyethylene weigh 3–5 oz (85–140 g), pack like a soda can, survive multiple uses, and cost little. One in every pack this book builds, and one per person in every vehicle for winter.
Honest physics still applies: a bivvy is a wind-and-radiation solution, not insulation. On cold ground it wants a pad, boughs, or the leaf-stuffed contractor bag below it; in real cold it wants your insulating layers inside it. The step up (insulated or breathable bivvies from the backpacking world) buys real warmth and less condensation at real prices; the step is worth it for anyone whose Chapter 4 audit includes routine cold exposure.
Tarps: the pack-scale roof
A tarp of roughly 8×10 ft (2.4×3 m) with 50 ft (15 m) of cordage builds a real roof in a dozen configurations, from rain fly to windbreak to heat reflector. It’s the most versatile shelter object a pack can carry, and it demands the most skill.
Material sets the weight class: coated nylon (silnylon and kin) packs to grapefruit size at backpacking prices; polyethylene tarps from the hardware store weigh triple and cost nothing (vehicle kits, home kits); ultralight laminates halve the nylon at luxury prices. Whatever the fabric, the spec list is short: grommets or tie-outs at corners and edge midpoints, a ridgeline’s worth of cordage, and stakes or the rocks and roots that replace them.
Configurations to actually learn (two, not twelve):
- A-frame. Ridgeline between two trees, tarp over it, corners staked. Best all-around rain shelter; wind sheds along the ridge.
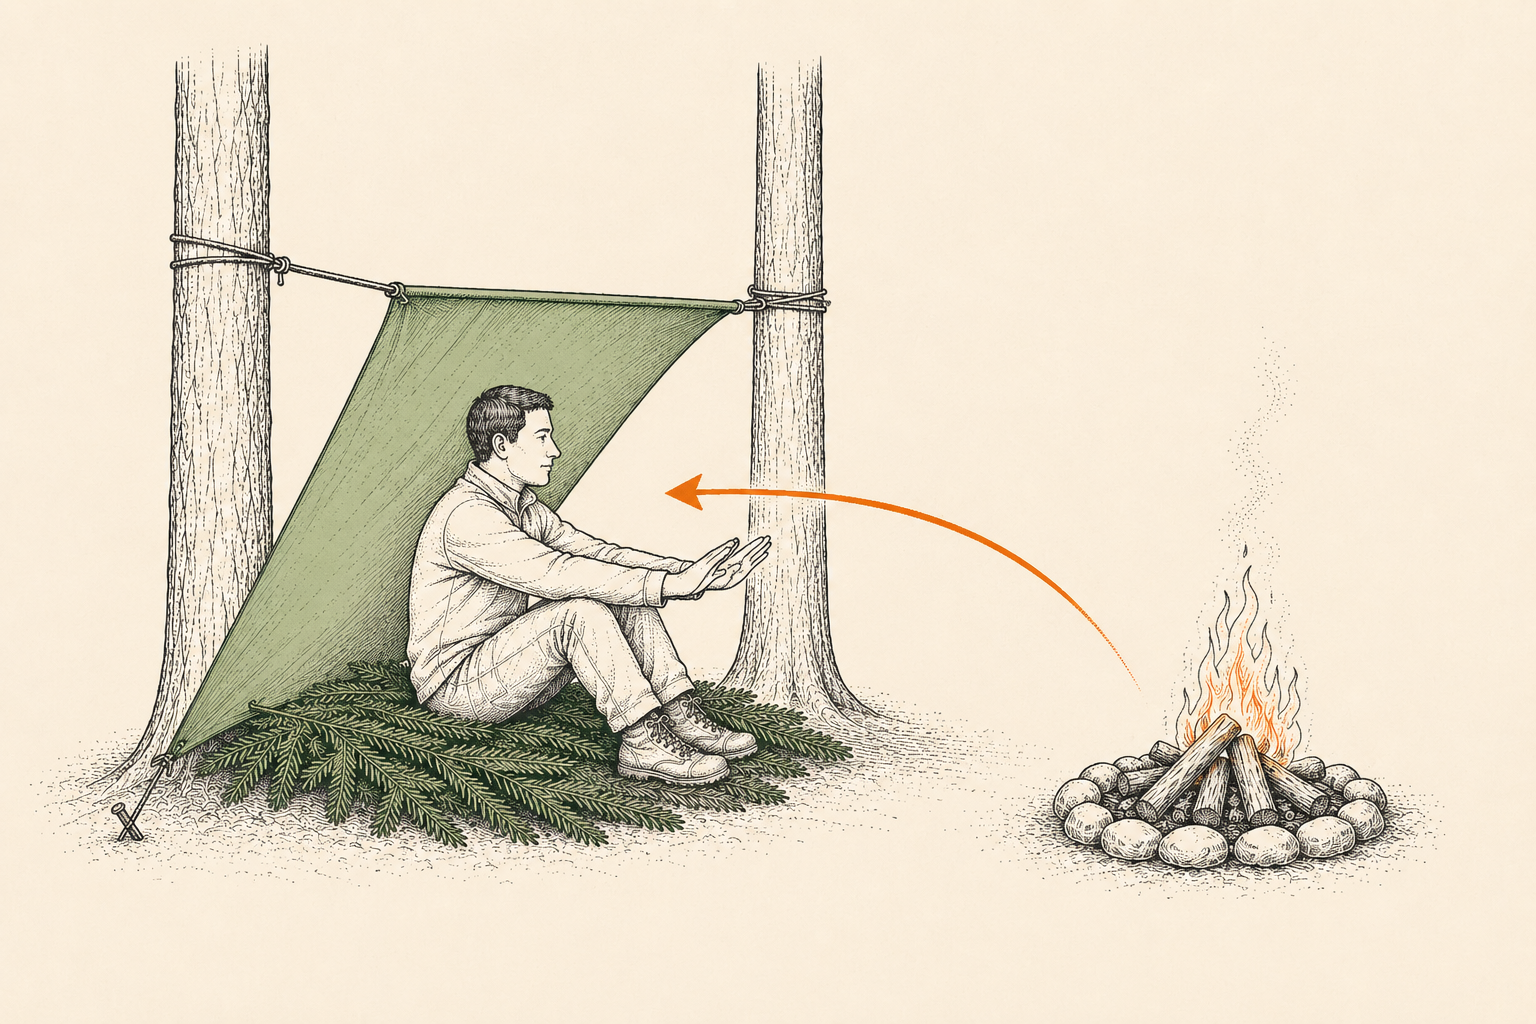
- Lean-to. One edge high (tied to trees or poles), the opposite edge staked to ground, opening away from wind or toward fire. Best heat-reflector setup: fire in front, and Chapter 2‘s radiation loss becomes radiation gain.
Every other named configuration is a variation you’ll improvise once these two are in your hands, which is a Chapter 40 backyard assignment, not a reading assignment.
Tube tents and trash-bag architecture
A tube tent is a tarp pre-bent into a triangle: cord through the tube, tie between two anchors, done. Contractor bags build the same shelter class for pocket change: worn as a bivvy, taped into a tube, or stuffed with leaves into a mattress.
The tube tent’s virtue is speed without skill: no configurations, no knots beyond two, walls and floor in one piece. Its costs: bulkier than a tarp of equal coverage, condensation (plastic breathes nothing; keep ends open), and single-storm durability at the cheap end. It’s a fair choice for vehicle kits and for anyone who wants shelter that assembles itself.
The contractor bag (3-mil, 42-gallon class) is this book’s favorite shelter raw material (Chapter 27 sings the rest of its résumé). Shelter uses alone: slit for a rain poncho (Chapter 21), two bags taped end-to-end as a sleeve bivvy, stuffed with dry leaves as a ground mattress (conduction, finally answered at zero ounces), sandbag-style wind wall filled with duff, and gear dry-bag while you build. Three bags ride in every pack and vehicle kit this book assembles; they weigh ounces and improvise like a hardware store.
Ground insulation: the forgotten half
Whatever roof you raise, the ground is the bigger thief: put 2–4 in (5–10 cm) of compressed insulation under you (pad, boughs, leaves, gear) before spending anything more on the roof. Cold-ground conduction outdraws cold air all night.
This is the chapter’s most under-bought item because it’s unglamorous. The backpacking answer (a foam or inflatable pad) is the gold standard and lives in Layer 3 and vehicle kits. The kit-improvised answers work honestly: the leaf-stuffed contractor bag, a bough bed (dead-and-down material, thick enough that you can’t feel ground through it), coiled rope, the emptied pack itself under your torso, floor mats and seat cushions in the vehicle scenario. The test is simple: lie down; anywhere you feel ground pressure is where heat is leaving.
Sitting counts too: ten minutes on a cold rock drains real heat (Chapter 2‘s seated figure was losing it at point A for a reason). The habitual fix is free: something, anything, between you and mineral earth, every time you stop.
Siting: where the shelter goes
Site selection is half of shelter performance: out of the wind, off the low ground where cold air pools, away from hazards overhead and uphill, and near (not in) the resources you’ll use. Five minutes of choosing beats an hour of building in the wrong spot.
The checklist that matters at dusk with weather coming: wind (put terrain, timber, or your lean-to’s back against it); cold drainage (valley floors and hollows collect the night’s coldest air; the classic advice holds: sleep partway up the slope, not at its bottom); water (near enough to use, far enough to avoid flood lines and the cold damp air along streams); overhead (no dead limbs, no lone-tree lightning posture, no rockfall lines); ground (flat enough, dry enough, insulation materials in reach).
In vehicles, siting compresses to one decision Chapter 36 details: the car is the shelter (windproof, visible, containing your supplies) except when exposure, water, or traffic makes it the hazard. Default to staying with it.
Assembling the night
The system, in order: site, then ground layer, then wind-and-rain layer, then your dry insulation inside it, then heat if you can afford it. Shelter is finished when you stop losing heat faster than you make it, and not before.
Walk the order once as a drill (Chapter 40 will make you do it for real). Site chosen by the checklist. Ground answered first (the leaf-bag mattress or pad), because building the roof first and sleeping on dirt is the classic backwards night. Then the envelope: tarp or bivvy or bag-architecture, tight against wind, vented against your own breath and sweat. Then you, in the driest layers the kit and your judgment preserved (Chapter 4‘s spare socks and base layer earn their slot tonight). Fire (Chapter 7) in front of a lean-to if conditions allow it: a heat source plus a reflector is the oldest heating system there is.
Then the smallest, most underrated shelter component: the hot drink and candle from Chapters 8 and 13, because core-warming from inside and a point of light do measurable and unmeasurable good respectively.
Pack This Chapter
- Shelter is heat management: windproof envelope, reflective/insulating layer, and always something under you.
- Mylar in every layer (carry two; they’re single-use in practice); bivvy in every pack (best upgrade per ounce); tarp plus 50 ft (15 m) cordage where weight allows.
- Learn two tarp rigs: A-frame for rain, lean-to for fire-reflected heat.
- Contractor bags are shelter raw material: poncho, bivvy, mattress, wind wall. Three per pack and vehicle.
- Ground first: 2–4 in (5–10 cm) under you beats a better roof. Site by wind, drainage, overhead, water, resources.
Where Kits Fail
- Roof pride, ground poverty. A taut tarp over bare dirt loses the night to conduction. Mattress before architecture.
- Mylar as sleeping bag. Wrapped tight on wet cotton, it disappoints on schedule. It’s a mirror and windbreak; feed it insulation.
- One blanket, reused. Last year’s mylar, refolded to card size, tears at deployment. They’re two-dollar single-use items; carry a spare.
- The hollow campsite. Sheltered-looking low ground pools the coldest air by dawn. Camp partway up, wind-shadowed, not at the drain.
Frequently asked
Do emergency mylar blankets actually work?
Yes, within their honest job: blocking wind and rain and reflecting a large share of your radiant heat back, in a two-ounce package. They don’t insulate and don’t fight cold ground, so pair one with dry layers and something under you. Expect one use per blanket and carry two.
What’s better, an emergency blanket or a bivvy?
The bivvy, whenever the ounces fit: the bag shape seals convection out in every direction without your hands’ help, survives reuse, and costs only a few ounces more. Blankets stay in the smallest layers and as the multi-tool (signal panel, shade, ground sheet); bivvies do the actual sleeping.
What size tarp is best for emergencies?
Around 8×10 ft (2.4×3 m) covers one or two people in an A-frame or lean-to with workable margins, and it’s the size this book’s packs carry with 50 ft (15 m) of cordage. Bigger buys comfort at weight; smaller demands skill you’ll wish you’d traded weight for.
How do you insulate yourself from cold ground?
Get 2–4 in (5–10 cm) of anything compressible under your body: a pad if you own one, otherwise a contractor bag stuffed with dry leaves, a thick bough bed, coiled rope, or the emptied pack under your torso. If you can feel the ground, heat is leaving; add material until you can’t.