Can a cheap survival kit actually work?
Yes. A genuinely useful kit costs $30–40 if you spend it deliberately, because most survival functions are covered brilliantly by cheap, boring items. The money game isn’t spending more; it’s spending unevenly in the right places.
This chapter exists because sticker shock stops more kits than laziness does. People price out a gear list, see a few hundred dollars, and postpone the whole project. But look at what the six functions actually require. Fire: a lighter and homemade tinder, a few dollars. Shelter: mylar blankets and contractor bags, a few more. Signaling: a loud whistle costs less than lunch. The expensive items in this subject are conveniences and upgrades far more often than they’re necessities.
The skill is knowing which few items punish cheapness, and buying those deliberately while cheerfully going cheap everywhere else. That map is the rest of this chapter.
Where cheap is fine
Go cheap without guilt on anything simple, passive, and redundant: mylar blankets, ponchos, whistles, matches, cordage, trash bags, foil, bandanas, candles, safety pins, sewing kits, and most containers.
What these share is mechanical honesty. A mylar blanket is a film; the bargain one and the boutique one are nearly the same film. A pealess whistle is a shaped piece of plastic with no moving parts to fail. Paraffin candles have no counterfeit problem. And where an item is fragile by nature (emergency ponchos tear no matter who makes them), the answer isn’t a costlier poncho; it’s carrying two, which the cheap price makes painless. Redundancy out of the savings beats quality you didn’t need.
The dollar-store and grocery aisles are legitimate kit suppliers for this whole category. Heavy-duty aluminum foil, freezer zip bags, petroleum jelly, cotton balls, tea, bouillon, sugar: half a tin kit’s contents come from stores that have never heard the word “tactical.”
Where cheap kills
Never bargain-hunt the items your life directly leans on: tourniquets, water treatment, rescue electronics, and any blade or tool whose failure becomes an injury. This short list is where the quality money goes.
The logic differs item by item, so here’s the honor roll of things worth real money:
| Buy deliberately | Why cheapness fails here |
|---|---|
| Tourniquet | Counterfeits with brittle windlasses flooded marketplaces; a tourniquet that snaps mid-application is a catastrophe (Chapter 26) |
| Water treatment | A filter is a medical claim in plastic; unverified filters mean drinking the pathogens you thought you removed (Chapter 11) |
| PLB / satellite messenger | Its entire value is working once, years after purchase, in the worst conditions of your life (Chapter 17) |
| Primary blade | Soft steel, weak locks, and handle failures turn hand tools into hand injuries (Chapter 23) |
| Prescription-adjacent items | Medications, epinephrine, and anything dosed: source properly, no exceptions |
Notice how short the table is. Five rows. Everything else in this book tolerates a budget version, which is exactly why the budget builds below work.
The $35 starter kit
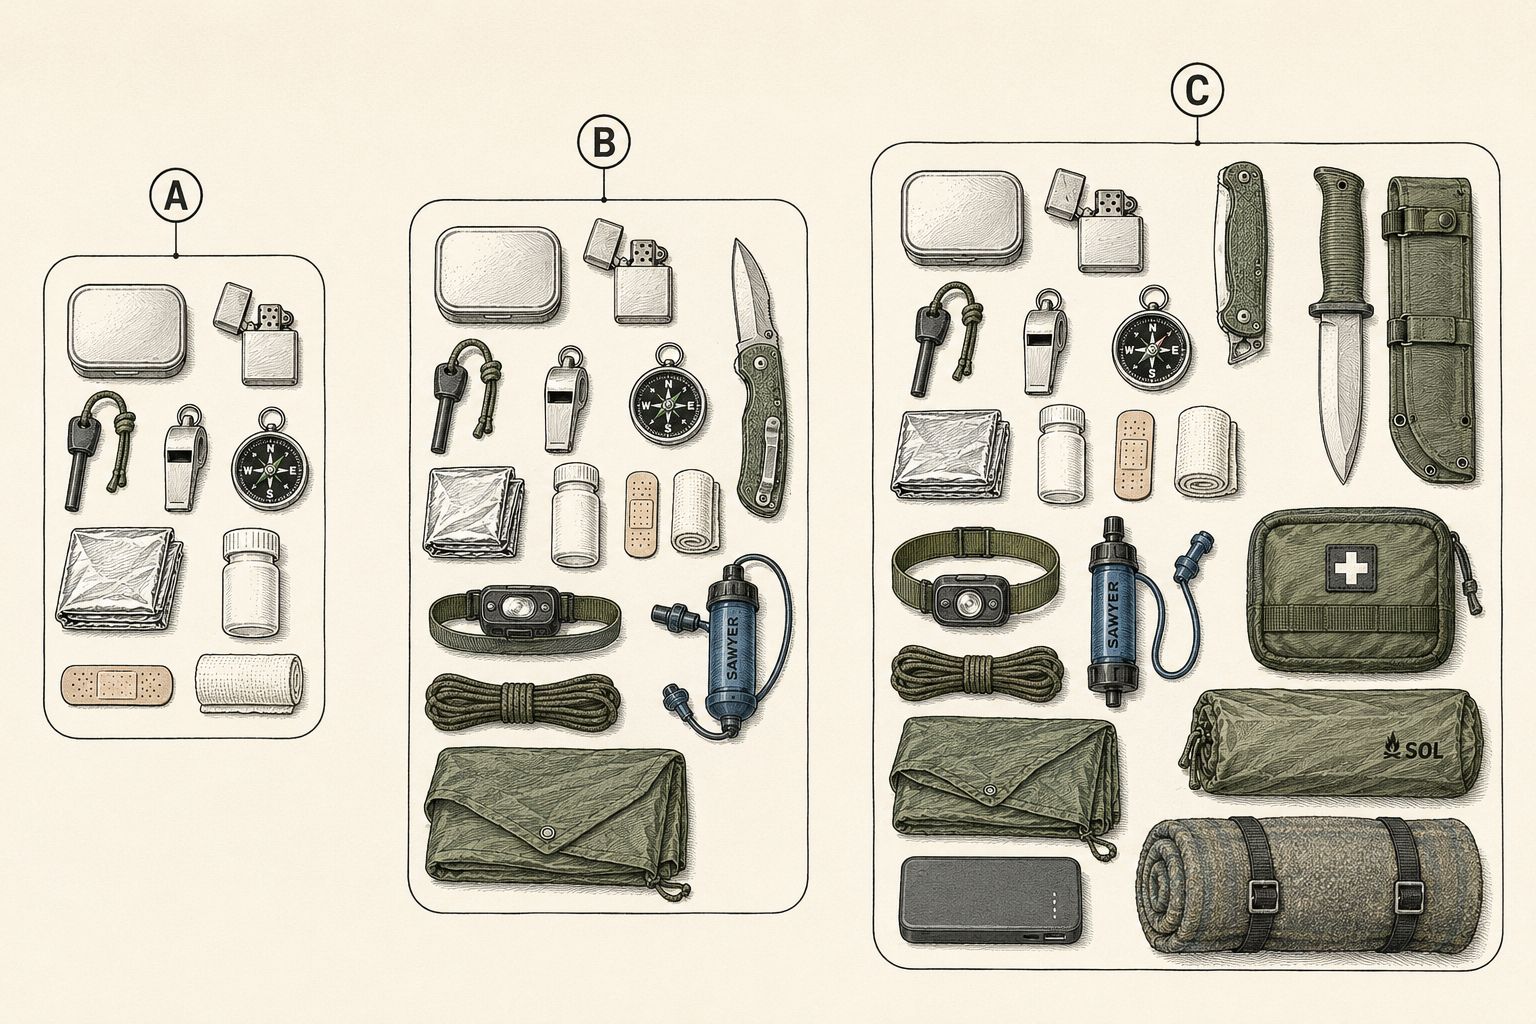
For about $35 you can cover all six functions in a tin-and-pocket kit: lighter, ferro rod, homemade tinder, whistle, button compass, purification tablets, folding water pouch, two mylar blankets, and basic wound supplies.
Prices are 2026 street-price ranges, rounded; your receipts will wander a few dollars either way:
| Item | Rough cost |
|---|---|
| Butane lighter + basic ferro rod | $8–10 |
| Cotton balls + petroleum jelly (dozens of fires’ worth) | $4 |
| Pealess whistle | $3–5 |
| 20 mm button compass | $4–6 |
| Purification tablets (chlorine dioxide, small count) | $8–10 |
| Folding 1 L water pouch | $3–4 |
| Two mylar blankets | $4–6 |
| Bandages, closure strips, antibiotic ointment packets | $4–5 |
| Tin (from your own cupboard) + tape seal | $0–3 |
That’s a real kit. Its compromises are honest ones: the tablets are slower than a filter, the compass points north without bells, the blade is whatever’s already in your pocket. Nothing in it is a fraud risk, and nothing in it fails the functions.
The $100 build
At $100, the starter kit gains the items that turn a rough night into a managed one: a decent single-blade knife, a real headlamp, a squeeze filter, stormproof matches, paracord, a poncho, and an upgraded first aid pouch.
The additions, roughly: a reputable-brand basic folding knife ($15–25) or fixed blade at the same money; an entry-tier headlamp from a known lighting brand ($20–25); a hollow-fiber squeeze filter ($20–30) with the tablets kept as backup; stormproof matches in a sealed vial ($6–8); 50 ft (15 m) of genuine 550 cord ($6–8); an emergency poncho and a second, thicker mylar-style blanket ($8–10); and $10 more of first aid depth (gauze, tape, tweezers, meds).
Notice the pattern: the second hundred dollars mostly buys speed, comfort, and redundancy rather than new functions. That’s correct and expected. The functions were covered at $35; now they’re covered well.
The $300 system
At $300 you’re no longer building a kit; you’re building the layered system of Chapter 3: pocket kit, day-pack kit, and the vehicle core, sharing components sensibly.
Rather than a receipt, here’s where the added $200 concentrates: a quality fixed-blade or premium folder as the system’s primary blade ($40–70); a second headlamp plus lithium spares and a power bank ($35–50); shelter that outlasts an evening (a real bivvy or tarp, $40–70); a first aid kit with a genuine tourniquet from an authorized source ($45–60); and the beginnings of the vehicle layer (wool blanket, water, duffel) from thrift and surplus money.
The honest signposts at this tier: past $300, the next meaningful jump is a satellite messenger or PLB (Chapter 17), which is its own purchase, and after that you’re buying comfort and speed, not survival. The curve of life-saving-per-dollar is steep at the bottom and flat past the middle. Spend the steep part first.
Spotting junk and counterfeits
Junk gear announces itself if you know the tells: prices too good for the physics, brand names almost spelled right, weight that doesn’t match the claim, and sellers with no traceable identity. Counterfeits cluster exactly where the stakes are highest.
A short field guide to the tells:
- Check the cordage trick. Genuine 550 paracord has a braided sheath around distinct inner strands (seven two-ply yarns in the classic mil-spec construction). “Paracord” with a fuzzy solid core or hollow sheath is decorative rope wearing the name.
- Weigh the claims. A “titanium” tool priced like tin, a “20,000 mAh” power bank light as a sandwich: mass is hard to fake. If the physics and the price disagree, believe the physics.
- Read the brand twice. Letter-swapped near-brands and logos that are almost right are the marketplace’s oldest move. Buy safety-critical gear from the maker or an authorized dealer, full stop.
- Distrust the heroic multi-tool. The 15-in-1 shovel-axe-saw-firestarter for $25 does each job worse than a $5 dedicated tool. Combination gear from real brands is fine; combination gear from no brand is a prop.
- Test everything cheap immediately. The great advantage of budget gear is that testing it costs nothing. Boil with it, soak it, drop it. Junk that fails on a calm Saturday saved you from discovering it later.
You learn tell number five in the backyard, ideally. The bargain-bin ferro rod is in your hand, first practice session, third strike, when the rod snaps clean at the handle and the stub shoots into the leaves. Eleven degrees colder and forty miles farther from pavement, that’s not an anecdote; it’s the whole evening. Test on grass, so the field never grades your receipts.
Upgrade order
When money arrives later, upgrade in this order: water treatment, light, blade, shelter, first aid depth, then rescue electronics. It’s the same priority logic as Chapter 2, applied to a wallet.
Water first because treatment quality and speed pay off in daily life and emergencies alike. Light second because a good headlamp is the upgrade you’ll feel weekly; it makes every other task possible after dark and makes practice sessions pleasant enough to happen. Blade third: a modest knife maintained sharp outperforms a premium knife that never got bought, but the jump in lock strength and edge-holding is real. Shelter fourth as your climate demands. First aid deepens as your training does (gear you aren’t trained for is dead weight with a red cross on it). And the satellite messenger caps the sequence, converting every future emergency into a shorter one.
Skip anything on the list you already own well. Upgrade order is a queue, not a shopping obligation.
Pack This Chapter
- $30–40 builds a real six-function kit. Cost is not the barrier; deliberateness is.
- Cheap is fine for simple, passive, redundant items. Buy redundancy with the savings.
- Five categories take real money: tourniquets, water treatment, rescue electronics, the primary blade, anything dosed. Authorized sources only for the medical items.
- Tiers: $35 covers the functions, $100 buys speed and depth, $300 builds the layered system. The life-saving-per-dollar curve flattens fast after that.
- Test cheap gear the day it arrives. Upgrade order: water, light, blade, shelter, first aid, satellite.
Where Kits Fail
- Postponed by sticker shock. The $300 fantasy kit that never got built loses to the $35 tin that did.
- Bargain tourniquets. The one item where a marketplace discount is a threat. Authorized sources, no exceptions.
- Premium everything. A kit too expensive to open never gets practiced with. Spend unevenly, on purpose.
- The untested bargain. Cheap gear’s only real cost is the hour of testing you owe it. Skip the hour and the field runs the test instead.
Frequently asked
Is a cheap survival kit better than no kit?
Dramatically, and it isn’t close. A $35 tin covering fire, water, shelter, signaling, navigation, and first aid changes the arithmetic of a bad night more than the difference between that tin and a $500 system ever will, because the first version of every function is the one that saves lives. Build cheap now, test it, and upgrade later in the order this chapter gives.
What survival gear should you never buy cheap?
Tourniquets and bleeding-control gear, water filters, personal locator beacons and satellite messengers, your primary blade, and anything medical or dosed. Those five categories concentrate nearly all the genuine counterfeit and quality risk in this subject. Everything else tolerates a budget version surprisingly well.
How can you tell fake paracord?
Open an end. Genuine 550 cord shows a braided outer sheath around distinct inner strands, classically seven two-ply yarns you can separate and use as fine line. Fakes hide a fuzzy solid core or nothing at all. Price is the other tell: cordage sold by the mile at a candy price isn’t holding 550 lb (250 kg).
What’s the single best upgrade under $50?
A quality headlamp with lithium spares, once your water treatment is sorted. Light is the upgrade you’ll use constantly rather than someday: every repair, every camp chore, every power outage, every practice session after work. Gear you use weekly stays maintained, and maintained gear is what works in emergencies.