What stops life-threatening bleeding?
Direct pressure stops most bleeding; a tourniquet stops limb bleeding that pressure can’t; packed hemostatic gauze plus pressure works the junctions tourniquets can’t reach. Those three sentences are the Stop the Bleed doctrine, and the kit module exists to serve them.
Chapter 2 put severe bleeding on the three-minute clock, and this is the chapter that answers it. The public-health campaign known as Stop the Bleed built a simple national curriculum around a hard fact: uncontrolled blood loss kills fast, help is minutes-to-hours away, and bystanders with basic tools and training save lives. The same fact governs backcountry, workshop, highway, and kitchen.
Every sentence that follows is doubled by one requirement: training. Bleeding control is a hands-on skill with cheap, widely available courses (a Stop the Bleed class runs about an hour; Chapter 40 assigns it). The gear below works in trained hands and hesitates in untrained ones, and hesitation is the enemy on a three-minute clock.
Direct pressure: the first and usual answer
Hard, direct, sustained pressure on the wound stops the great majority of bleeding: both hands, your full weight behind them, straight into the source, without peeking. Gauze helps; hands do the work.
The mechanics matter because instinct gets them wrong. Pressure must be on the bleeding point (not vaguely on the area), hard (arterial pressure is strong; lean in), and sustained (clots need minutes undisturbed; lifting to check restarts the clock: the classic error). Cloth (gauze, the Chapter 27 bandana, a shirt) concentrates and grips, but the pressure is the treatment. If blood soaks through, more cloth goes on top; the original layer stays.
Position and exposure round it out: get the wound visible (cut clothing away; this is the trauma shears’ whole career), get the patient down (fainting standing up adds a head injury), and gloves on from the kit if seconds allow. Then someone’s phone is dialing and someone’s hands are pressing, and those can be the same person on speaker.
Tourniquets: the limb answer
A commercial windlass tourniquet, placed high and tight on an arm or leg and cranked until the bleeding stops, is the answer to limb bleeding that pressure can’t control. Modern practice rehabilitated it completely: applied correctly, it saves lives at very low risk to the limb.
The old fear (“tourniquet means losing the limb”) died under modern battlefield and EMS data; the current teaching is blunt: life over limb, and limbs tolerate proper tourniquets for hours. The technique, as trained:
- High and tight. Place it 2–3 in (5–7.5 cm) above the wound (never on a joint), directly on skin or thin clothing.
- Pull the slack hard, then crank. The strap tightens first; the windlass rod then twists until bleeding stops: not slows, stops.
- Expect pain. A working tourniquet hurts. That’s confirmation, not a reason to loosen.
- Lock and label. Secure the rod, write the time on the tab or forehead, and never loosen it in the field; removal is a hospital’s job.
- If one isn’t enough, a second goes beside the first, closer to the torso.
The buying rule repeats from Chapter 6 at maximum volume: authorized medical suppliers only. Counterfeit tourniquets with brittle windlasses and slipping buckles are a documented plague on marketplace listings, and this is the one item whose failure announces itself mid-crisis. Improvised tourniquets (belt-and-stick, cravat-and-carabiner) are the trained fallback, far better than death and far worse than the real thing.
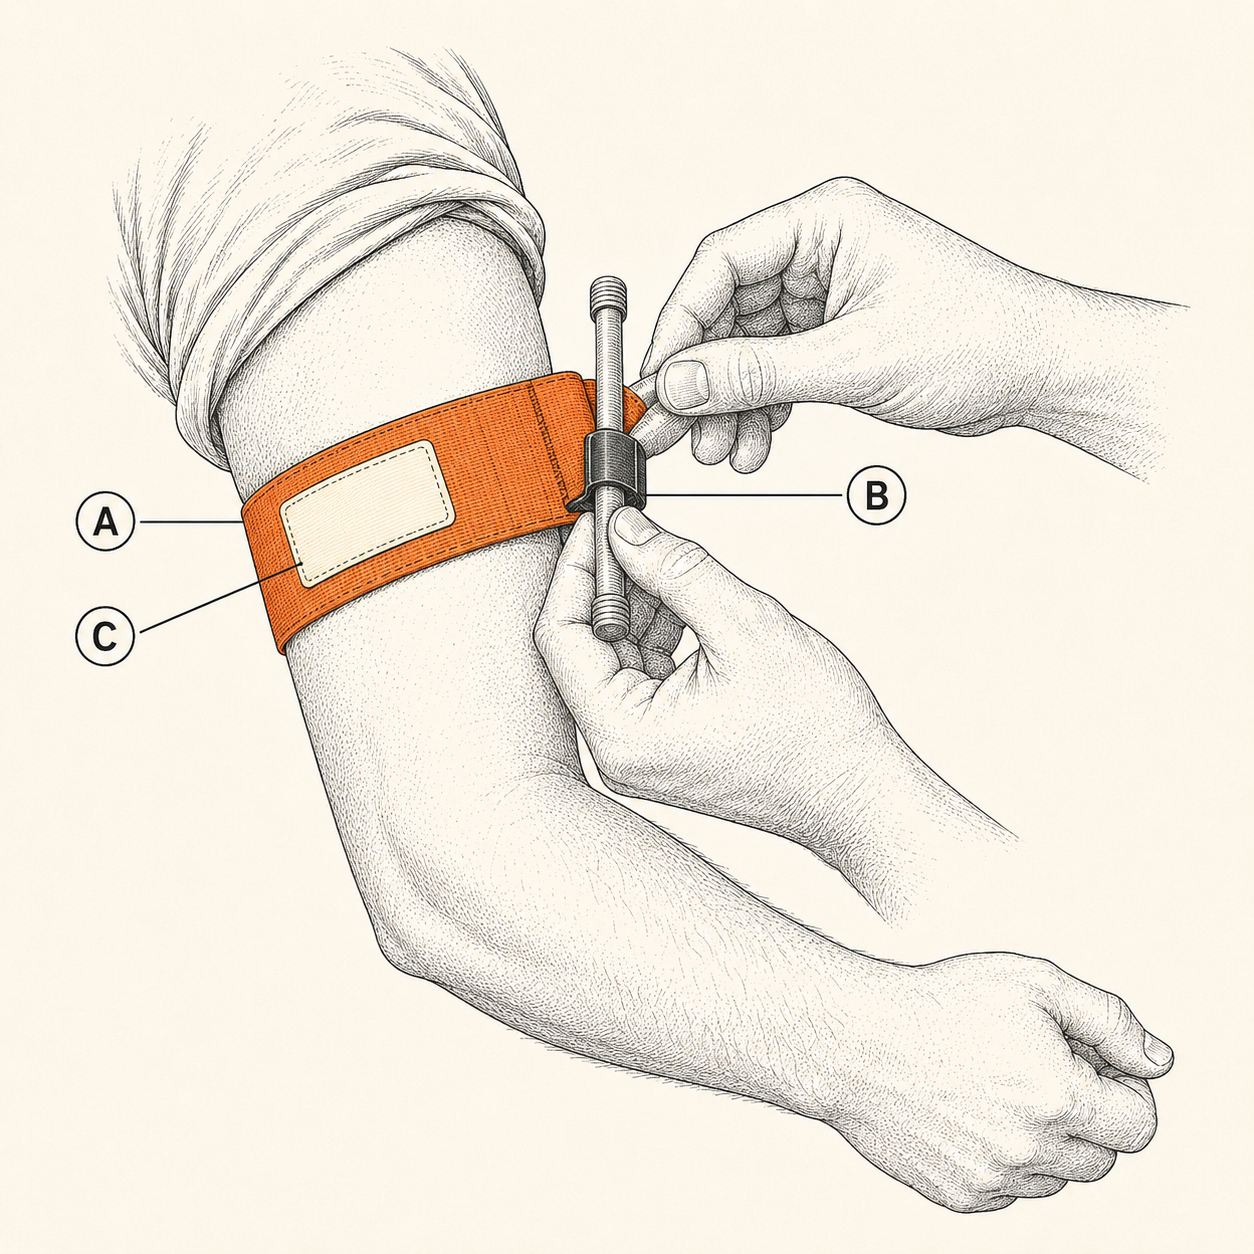
Wound packing and hemostatic gauze
Junctional wounds (groin, armpit, neck-adjacent, shoulder) can’t take tourniquets; they take packing: gauze fed deep into the wound against the bleeding vessel, then relentless pressure on top. Hemostatic gauze (clotting-agent impregnated) makes the same technique work faster.
Packing is the counterintuitive skill of the set, which is why the course matters: the gauze goes into the wound cavity (finger-fed, steadily, filling it against the source) rather than on top, and the topping pressure then holds for minutes by the clock. Kaolin-impregnated hemostatic gauze accelerates clotting where plain gauze must rely on pressure alone; both work, one buys margin, and the kit carries hemostatic where budget allows and plain compressed gauze regardless (packing eats volume; carry more gauze than seems reasonable).
Where packing does not go: chest and abdominal cavities (that bleeding is surgical territory; the field answer is pressure on what’s reachable, a seal on sucking chest wounds below, and speed), and skulls. Junctions and limbs are packing country.
Pressure bandages and the rest of the module
The pressure bandage (Israeli-style emergency bandage) is the module’s finisher: a sterile pad, integrated elastic wrap, and a tensioning bar that turns one rescuer’s dressing into sustained mechanical pressure. Add gloves, shears, a compact chest seal, and a marker, and the bleeding module is complete.
The Israeli-pattern bandage earns its fame by doing three jobs in one wrapper: dressing the wound, applying real pressure without a hand staying behind, and securing itself; every kit from the pack up carries one, and the vehicle carries two. The chest seal (an occlusive sticker for penetrating chest wounds, vented patterns preferred) covers the sucking-chest-wound scenario: seal the hole, let the vent work, evacuate fast. Trained users add it at pack scale; everyone adds it at vehicle scale where highway trauma is the design case.
The complete bleeding module this book’s builds reference: 1 tourniquet (2 in vehicles), hemostatic gauze ×1, compressed gauze ×2, Israeli-style bandage, chest seal pair, nitrile gloves ×2 pairs, trauma shears, marker.
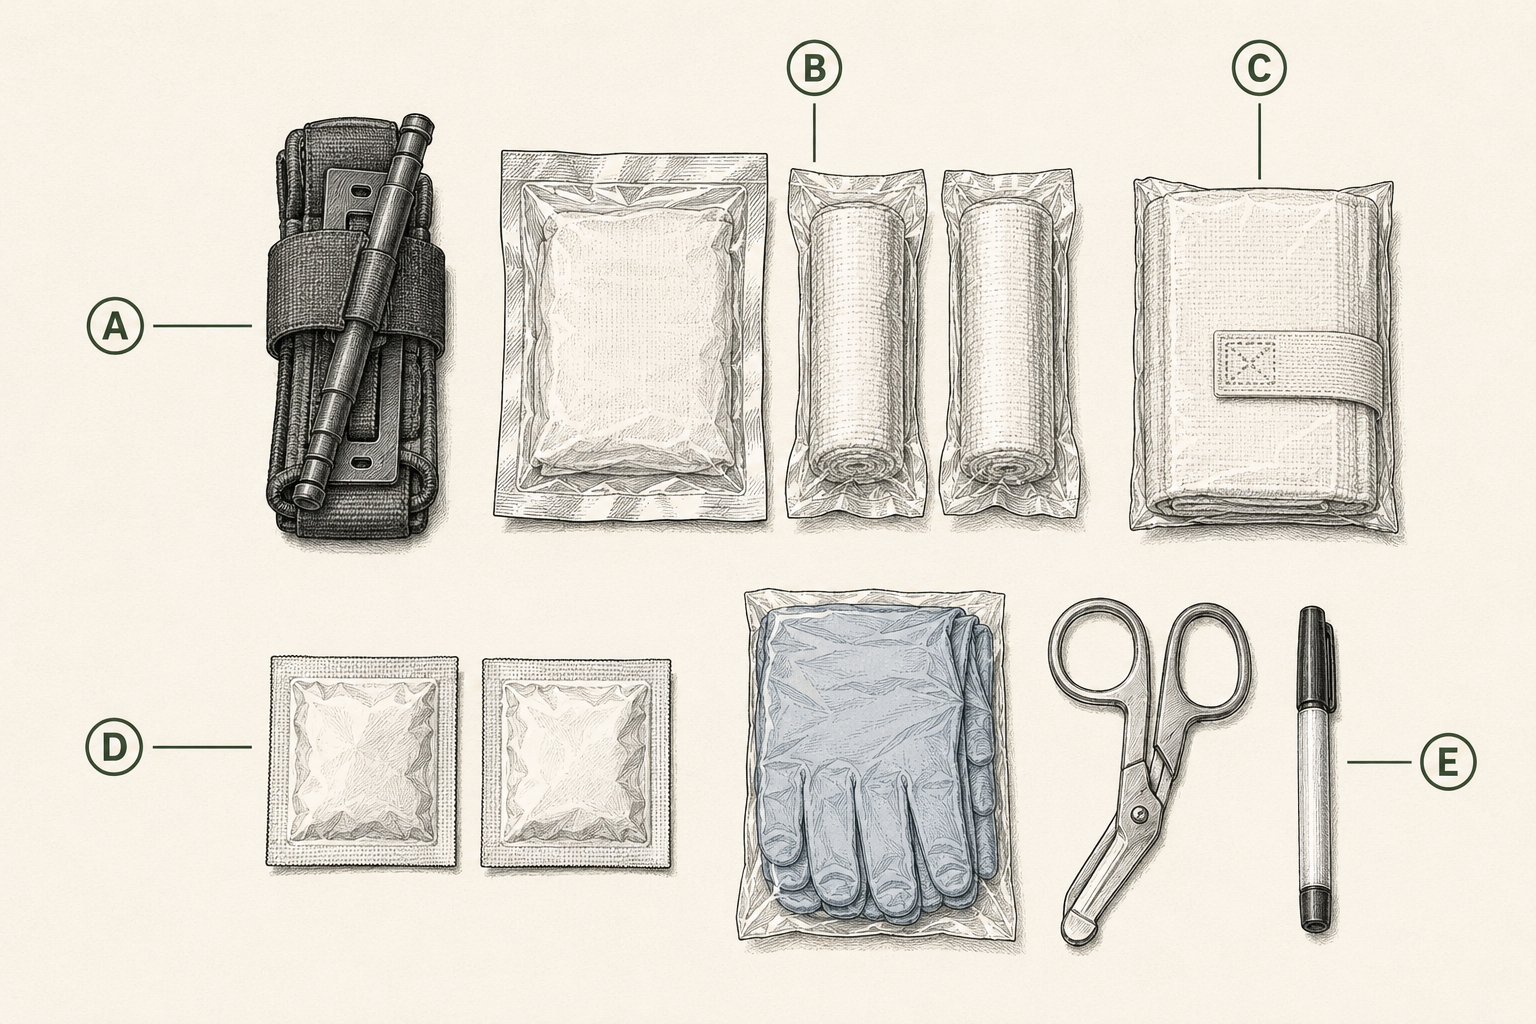
Packed together, visible (classically in a red pouch), and never buried: the three-minute clock doesn’t wait for excavation.
The IFAK idea
An IFAK (“individual first aid kit,” the military’s term of art) is simply the bleeding module packaged as a grab-unit: one pouch, one purpose, staged where trauma might happen. The concept transfers to civilian life intact: one in the pack, one in the vehicle, one near the workshop saw.
What makes an IFAK an IFAK is discipline, not camouflage: trauma gear only (no bandage clutter slowing access), packed in a consistent layout (your hands learn it), staged at the point of likely need rather than centralized, and personal (the military logic applies at home: the kit rides with the person or station it protects, and you treat someone using their kit before your own where possible, keeping yours for you).
Civilian staging that makes sense: the day pack’s lid, the vehicle’s door pocket or console (not the trunk under luggage), the range bag for shooters, the workshop wall, the kitchen of an ambitious cook. The common thread is the reach test: if severe bleeding started here, is the module in arm’s-to-seconds’ reach?
Buying real gear
Bleeding-control gear is the kit’s zero-tolerance counterfeit zone: buy tourniquets, hemostatics, and seals from manufacturers or authorized medical suppliers, verify current-generation models, and pay the real price. The marketplace discount version is a prop.
Chapter 6 introduced the rule; here’s the operational version. Tourniquets: buy the widely fielded windlass models by name from authorized dealers (the manufacturers list them), expect real prices (suspiciously cheap is the tell), and buy one extra as the training unit (practice wears them; the carried one stays fresh). Hemostatic gauze: real brands, dated packaging, replaced at expiry. Chest seals: vented designs from medical suppliers. Everything: inspect on arrival (packaging, mechanism, stitching), and rotate per Chapter 41 (elastics age, adhesives die in hot vehicles).
Training gear deserves its own line: the practice tourniquet, a pool noodle or willing leg, and an hour of drills convert this chapter from reading into reflex. The course first, then drills quarterly, thirty seconds each: high, tight, crank, lock, time.
The scene, run correctly
Bleeding control runs as a sequence: scene safe, hands on the wound, help summoned, tools applied, patient warm, nothing loosened. Memorize the sequence and the tools have a place to live.
Run it once here, as rehearsal. The saw kicks back, or the guardrail does, and there’s more blood than seems possible. Scene: you don’t become casualty two (traffic, the still-running saw, the dog). Pressure: both hands, full weight, on the point, now; the kit arrives to you if someone else can fetch it. Summon: Chapter 17‘s loudest tool, on speaker, while pressure continues. Tools: limb and uncontrolled means tourniquet high-and-tight-and-time-written; junction means pack and press; torso means pressure, seal if penetrating, and speed. Then: the patient goes flat and warm (Chapter 20‘s blanket has a trauma job: shock is cold), nothing applied gets loosened, and reassessment loops until handoff.
The whole sequence is teachable to a household in an evening, and Chapter 39 argues you should: the person most likely to press on your wound lives with you.
Pack This Chapter
- Doctrine in three lines: pressure stops most bleeding; tourniquets stop limb bleeding pressure can’t; packing plus pressure works the junctions.
- Tourniquets: commercial windlass, authorized sources only, high and tight, crank till it stops, lock, write the time, never loosen in the field. Pain is confirmation.
- Packing: gauze fed deep against the source, then minutes of hard pressure; hemostatic buys margin; never into chest or abdomen.
- The module: tourniquet, hemostatic + compressed gauze, Israeli-style bandage, chest seals, gloves, shears, marker: one visible pouch per pack, vehicle, and workshop.
- Training makes it real: a Stop the Bleed course, then quarterly thirty-second drills. Control the bleed AND summon help.
Where Kits Fail
- The bargain tourniquet. A brittle windlass snapping mid-crank is the worst sound this book contains. Authorized suppliers, real prices, no exceptions.
- Trauma gear entombed. The module under the camp stove, forty seconds deep, on a three-minute clock. Visible pouch, reach-tested staging.
- The peek. Lifting pressure “to check” restarts the clot from zero. Soaked-through means more gauze on top, never off.
- Gear outrunning training. An unopened IFAK and no course is a costume. The class is an hour; take the household.
Frequently asked
When should you use a tourniquet?
For limb bleeding that direct pressure can’t control: blood that spurts, pools fast, or soaks dressings despite real pressure. Place it high and tight above the wound, crank until bleeding stops, lock it, write the time, and get emergency care moving. Modern practice is clear: applied correctly, it’s life-saving and limb-safe for hours.
What is hemostatic gauze and do I need it?
Gauze impregnated with a clotting accelerant (kaolin in the common versions), used for packing wounds at junctions a tourniquet can’t serve: groin, armpit, shoulder, neck-adjacent. Packed deep against the source and pressed hard for minutes, it buys clotting speed plain gauze can’t. Pack-scale kits and up carry it.
What goes in an IFAK?
Trauma only: a real windlass tourniquet, hemostatic and compressed gauze, an Israeli-style pressure bandage, vented chest seals, nitrile gloves, trauma shears, and a marker for the tourniquet time. No bandage clutter: the pouch’s job is severe bleeding, staged in arm’s reach of where trauma could happen.
Can you improvise a tourniquet?
A trained person can: a wide band (belt, cravat) plus a rigid windlass (stick, carabiner) twisted and secured, applied with the same high-tight-until-it-stops standard. Improvisations fail more and hurt worse, which is the argument for carrying the real thing and taking the hour-long course that makes both work.